वेबसाइट:www.bonsaiplantsnursery.com व्हाट्सएप: 8299790172 विषय: कम जमीन में ज्यादा कमाई करने वाले 5 हाई प्रॉफिट प्लांट्स
🌱 भूमिका: क्या सच में छोटे खेत से लाखों कमाए जा सकते हैं?
आज के समय में खेती सिर्फ परंपरागत काम नहीं रही, बल्कि एक high income business opportunity बन चुकी है। पहले लोग मानते थे कि खेती में सिर्फ बड़े किसान ही पैसा कमा सकते हैं, लेकिन अब यह सोच पूरी तरह बदल चुकी है।
अगर आपके पास सिर्फ 1 बीघा, 1 एकड़ या उससे भी कम जमीन है, तब भी आप सही पौधों का चुनाव करके हर साल लाखों रुपये की कमाई कर सकते हैं।
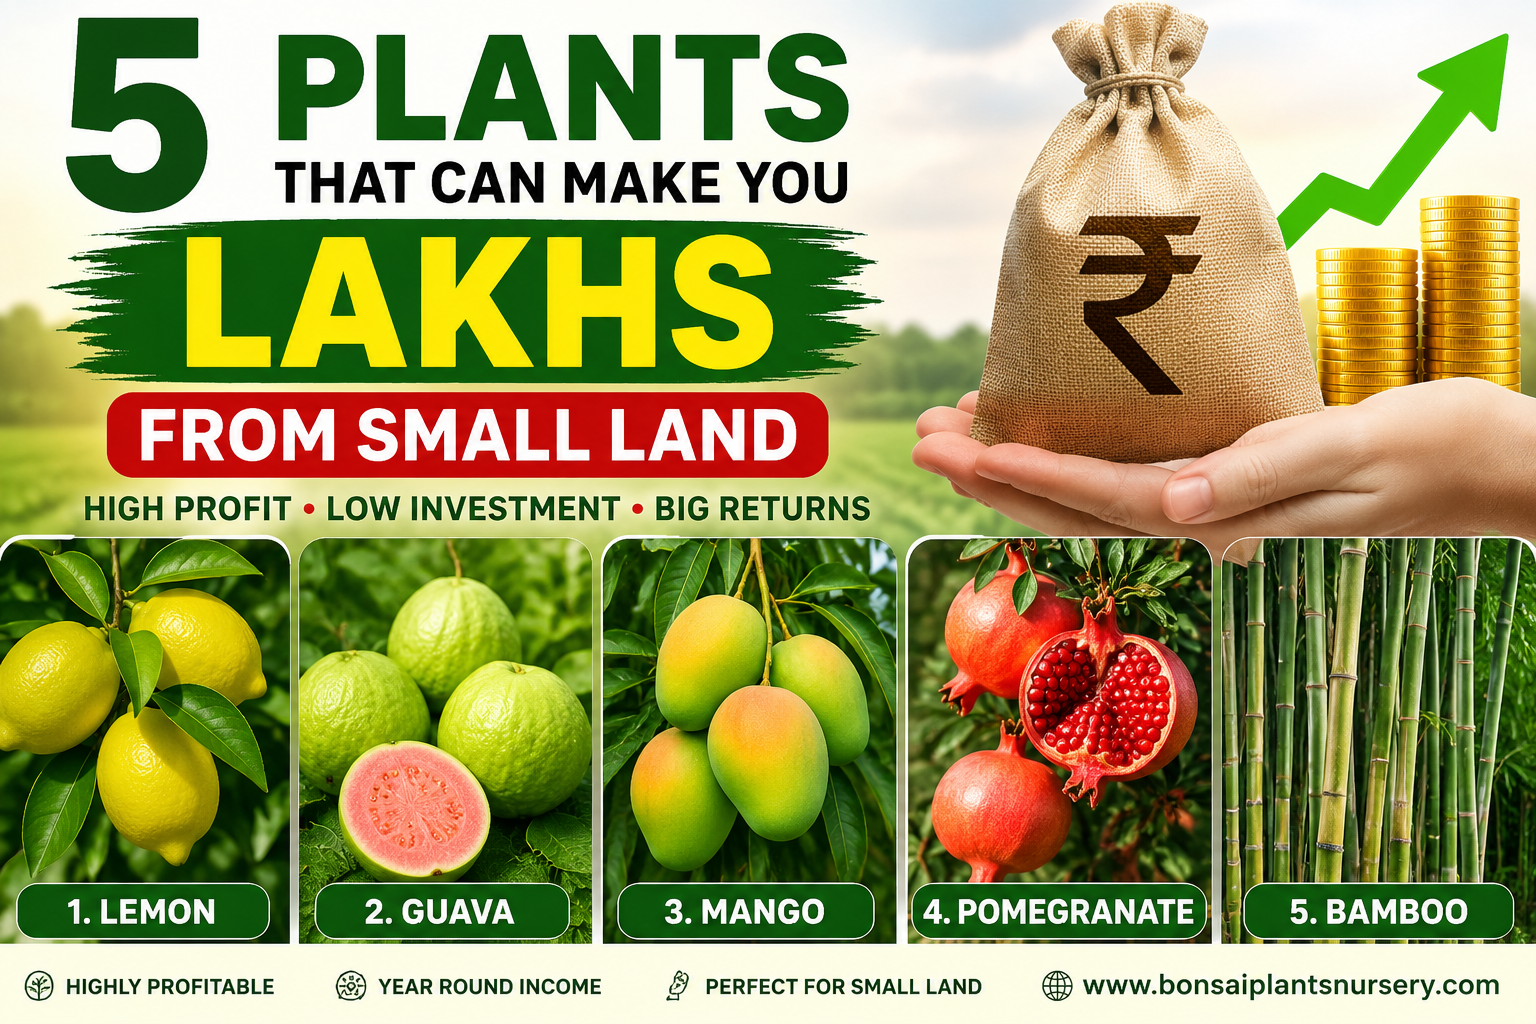
5_Plants_That_Can_Make_You_Lakhs
इस ब्लॉग में हम आपको ऐसे 5 खास पौधों के बारे में बताएंगे जो:
कम देखभाल में उगते हैं
जल्दी मुनाफा देते हैं
बाजार में हमेशा डिमांड में रहते हैं
और लंबे समय तक आय देते हैं
🌳 1. नींबू (Kagji Nimbu) – सबसे तेज और लगातार कमाई वाला पौधा
नींबू खेती भारत में सबसे ज्यादा लाभ देने वाली फसलों में से एक है। खासकर कागजी नींबू की डिमांड हर मौसम में बनी रहती है।
🍋 क्यों नींबू सबसे बेस्ट है?
साल भर फल देता है
3 साल में उत्पादन शुरू
कम पानी में भी बढ़िया ग्रोथ
मार्केट में हमेशा डिमांड
💰 कमाई कितनी हो सकती है?
अगर आप 1 एकड़ में 200–250 नींबू के पौधे लगाते हैं:
प्रति पौधा औसतन 30–50 kg फल
बाजार भाव: ₹20–₹60 प्रति kg
कुल सालाना कमाई: ₹2 लाख से ₹6 लाख+
🌿 खास टिप्स:
ड्रिप इरिगेशन लगाएं
ऑर्गेनिक खाद का उपयोग करें
नियमित pruning करें
👉 सही देखभाल से यह पौधा 15–20 साल तक उत्पादन देता है।
🌳 2. अमरूद (Guava) – कम लागत, ज्यादा मुनाफा
अमरूद को “गरीब का सेब” भी कहा जाता है, लेकिन कमाई में यह किसी भी प्रीमियम फल से कम नहीं है।
🍏 क्यों अमरूद फायदेमंद है?
2–3 साल में फल देना शुरू
कम पानी और कम देखभाल
हर मौसम में मांग
कम लागत में ज्यादा उत्पादन
💰 कमाई का अनुमान:
1 एकड़ में 300–400 पौधे:
प्रति पौधा 40–80 kg उत्पादन
बाजार मूल्य ₹15–₹40 प्रति kg
कुल कमाई: ₹3 लाख से ₹8 लाख प्रति वर्ष
🌿 बेस्ट वैरायटी:
इलाहाबादी सफेदा
लखनऊ-49
थाई अमरूद (High demand premium variety)
🌳 3. आम (Mango) – लंबे समय की सबसे सुरक्षित निवेश फसल
आम को “फलों का राजा” कहा जाता है और यह भारत की सबसे स्थिर और भरोसेमंद फसल है।
🥭 क्यों आम खेती शानदार है?
4–5 साल में उत्पादन
30+ साल तक फल
कम मेंटेनेंस
एक्सपोर्ट मार्केट में डिमांड
💰 कमाई:
1 एकड़ में 100–120 पौधे:
प्रति पौधा 80–150 kg फल
₹20–₹80 प्रति kg (क्वालिटी पर निर्भर)
कुल कमाई: ₹4 लाख से ₹10 लाख+ प्रति वर्ष
🌿 लोकप्रिय किस्में:
दशहरी
लंगड़ा
केसर
आम्रपाली (High density farming)
👉 High Density Mango Farming से कम जमीन में ज्यादा उत्पादन संभव है।
🌳 4. अनार (Pomegranate) – सबसे ज्यादा प्रॉफिट वाला क्रॉप
अनार को “Red Gold” भी कहा जाता है क्योंकि इसकी बाजार कीमत बहुत स्थिर और ऊंची रहती है।
🍎 क्यों अनार खेती?
कम पानी में उगता है
सूखे इलाकों में भी सफल
2–3 साल में उत्पादन
export quality demand
💰 कमाई:
1 एकड़ में 400–500 पौधे:
प्रति पौधा 25–40 kg फल
बाजार मूल्य ₹40–₹120 प्रति kg
कुल कमाई: ₹5 लाख से ₹12 लाख प्रति वर्ष
🌿 बेस्ट वैरायटी:
भगवा (सबसे लोकप्रिय export variety)
गणेश
अरक्ता
🌳 5. बांस (Bamboo) – सबसे ज्यादा लंबी अवधि का पैसा देने वाला प्लांट
अगर आप ऐसी खेती चाहते हैं जो एक बार लगाने के बाद सालों तक पैसा दे, तो बांस सबसे अच्छा विकल्प है।
🎋 क्यों बांस खास है?
बहुत तेजी से बढ़ता है
कम देखभाल
इंडस्ट्री में भारी डिमांड
पेपर, फर्नीचर, निर्माण में उपयोग
💰 कमाई:
1 एकड़ में 400–600 पौधे:
3–4 साल बाद कटाई शुरू
प्रति पौधा कई बार कटाई संभव
सालाना कमाई: ₹3 लाख से ₹15 लाख+
👉 लंबे समय के लिए यह “wealth building crop” है।
📊 तुलना तालिका (Best Profit Crops)
पौधा
शुरुआत
कमाई
मेंटेनेंस
नींबू
3 साल
₹2–6 लाख
कम
अमरूद
2–3 साल
₹3–8 लाख
कम
आम
4–5 साल
₹4–10 लाख
मध्यम
अनार
2–3 साल
₹5–12 लाख
मध्यम
बांस
3–4 साल
₹3–15 लाख
बहुत कम
🌿 कम जमीन में ज्यादा कमाई कैसे करें?
अगर आपके पास कम जमीन है तो इन बातों का ध्यान रखें:
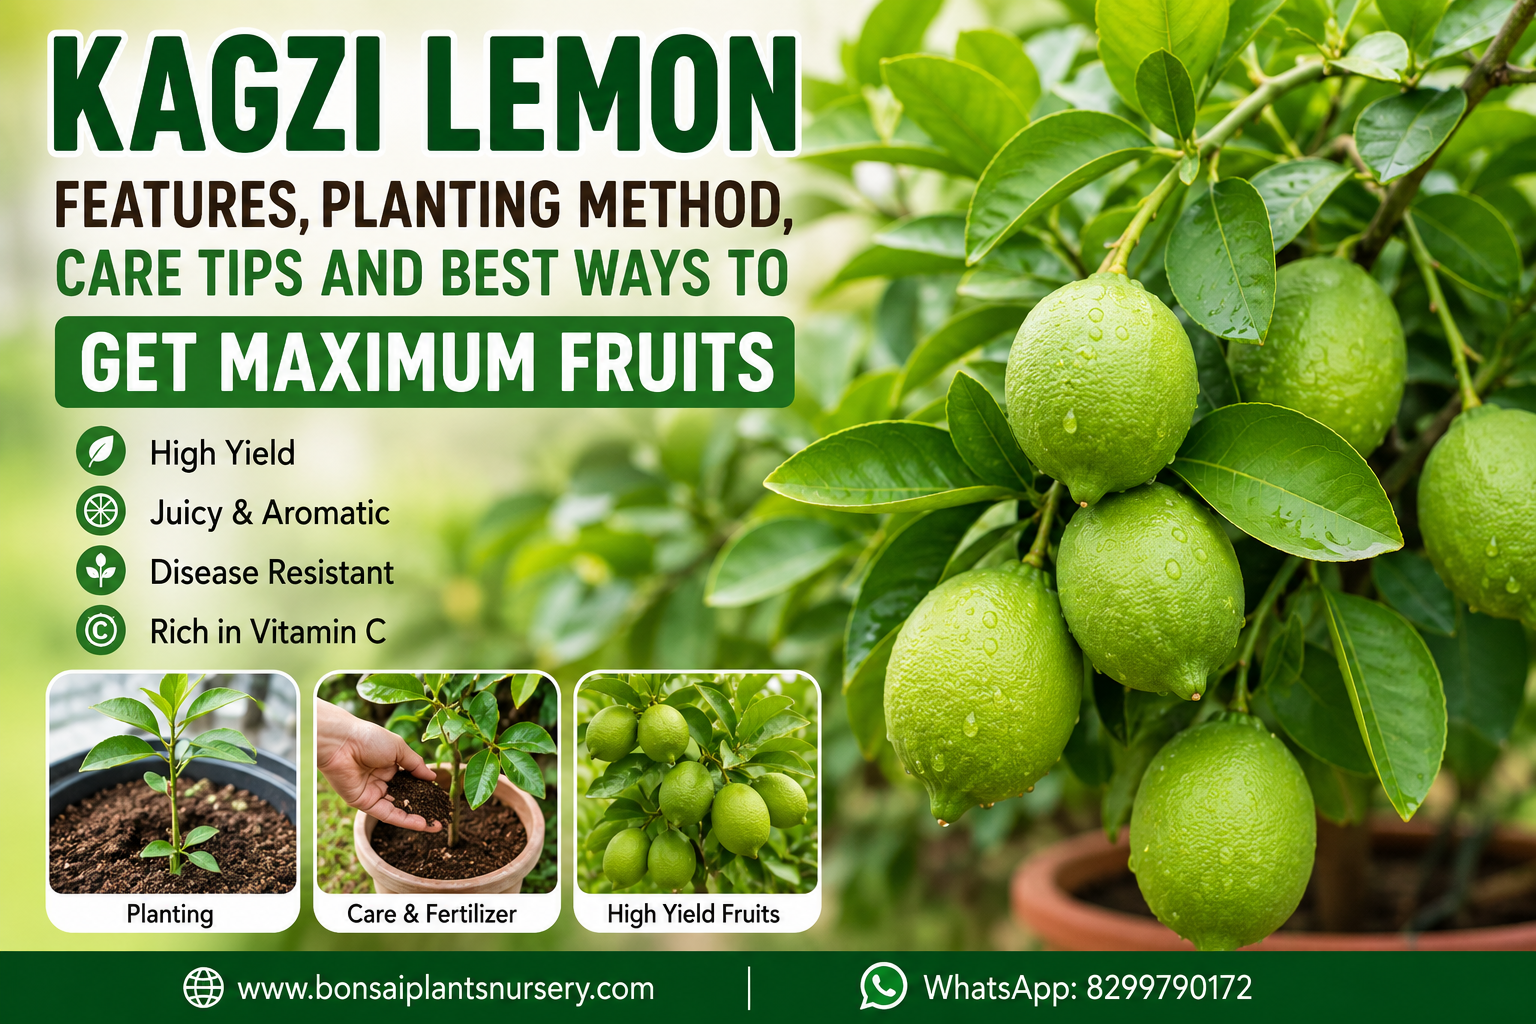
Kagzi lemon is one of the most popular citrus fruits grown in India and many other tropical countries. It is widely used in homes, restaurants, beverages, pickles, salads, medicines, and beauty products. Due to its juicy pulp, thin peel, refreshing aroma, and high vitamin C content, Kagzi lemon has become an essential fruit in every household.
In recent years, the demand for Kagzi lemon plants has increased significantly because people are now more interested in home gardening, terrace gardening, organic farming, and kitchen gardening. Whether you have a large farm, a backyard garden, a rooftop, or a balcony, Kagzi lemon can be successfully grown almost everywhere with proper care.
This detailed guide explains everything about Kagzi lemon including its features, benefits, planting methods, soil preparation, watering schedule, fertilizers, pruning, disease control, organic care methods, and expert tips to get maximum fruit production.
If you want healthy, fast-growing, and highly productive lemon plants, this article will help you achieve excellent results.
What is Kagzi Lemon?
Kagzi lemon is a popular citrus fruit variety scientifically known as Citrus aurantifolia. It is commonly called lime in English. The plant belongs to the Rutaceae family and grows best in warm climates.
The fruit is smaller in size compared to regular lemons but contains more juice and a stronger aroma. Its peel is thin and smooth, making it ideal for commercial as well as household use.
Kagzi lemons contain a large amount of juice compared to many other lemon varieties. This makes them highly valuable in the market.
2. Thin Peel
The peel is thin and soft, allowing better juice extraction.
3. Strong Aroma
Its refreshing citrus fragrance makes it ideal for beverages and cooking.
4. Multiple Fruiting
With proper care, Kagzi lemon plants can produce fruits several times a year.
5. Suitable for Pots and Farms
It can be successfully grown in containers, grow bags, terraces, balconies, and open fields.
6. Rich in Vitamin C
Kagzi lemon improves immunity and provides many health benefits.
7. Long Productive Life
A healthy lemon plant can continue fruiting for 15 to 20 years or even longer.
Health Benefits of Kagzi Lemon
Kagzi lemon is not only useful in cooking but also highly beneficial for health.
Rich Source of Vitamin C
It strengthens the immune system and helps fight infections.
Improves Digestion
Lemon water is widely used to improve digestion and detoxify the body.
Good for Skin
The antioxidants present in lemon help improve skin glow.
Helps in Hydration
Lemon drinks are refreshing during summer.
Supports Weight Management
Many people include lemon in their daily diet for fitness purposes.
Best Climate for Kagzi Lemon
Kagzi lemon grows best in tropical and subtropical climates.
Ideal Conditions
Temperature: 20°C to 35°C
Sunlight: 6 to 8 hours daily
Moderate rainfall
Frost-free environment
Extreme cold and frost can damage the plant badly.
Best Soil for Kagzi Lemon Plants
Kagzi lemon grows in different soil types, but well-drained loamy soil is considered ideal.
Soil Requirements
Good drainage
Rich organic matter
pH between 5.5 and 7.5
Loose and fertile texture
Avoid waterlogged soil because excess moisture causes root rot.
Best Time to Plant Kagzi Lemon
The ideal planting seasons are:
February to March
July to August
Rainy season planting helps the roots establish quickly.
Container-grown plants can be planted throughout the year if proper watering is available.
How to Select a Healthy Kagzi Lemon Plant
Choosing the right plant is very important for better fruit production.
Always Select:
Grafted plants
Disease-free plants
Healthy green leaves
Strong stem
Active growth
Avoid weak or yellow plants.
How to Plant Kagzi Lemon in Ground
Step 1: Prepare the Pit
Dig a pit of:
2 feet depth
2 feet width
2 feet length
Step 2: Prepare Soil Mixture
Mix:
Garden soil
Well-rotted cow dung manure
Neem cake
Sand
Vermicompost
Step 3: Planting
Remove the plant carefully from the nursery bag
Keep roots undamaged
Place the plant upright
Fill soil around roots
Press lightly
Water immediately
How to Grow Kagzi Lemon in Pots
Kagzi lemon is one of the best fruit plants for terrace gardening.
Pot Size
Use a pot of at least:
18 to 24 inches
Potting Mix
40% garden soil
30% cow dung manure
20% sand
10% cocopeat or vermicompost
Important Tips
Ensure drainage holes
Keep in partial shade for 2 days after planting
Shift gradually to sunlight
Watering Schedule for Kagzi Lemon
Proper watering is essential for healthy growth and fruit production.
Summer Watering
Water every 3 to 4 days
Do not let soil dry completely
Winter Watering
Water every 7 to 10 days
Rainy Season
Prevent waterlogging
Overwatering can cause root diseases.
Fertilizer Management for Maximum Fruits
Nutrient management plays a major role in increasing lemon production.
Organic Fertilizers
Apply every 2 to 3 months:
Cow dung manure
Vermicompost
Neem cake
Mustard cake
Chemical Fertilizers
Commercial growers may use balanced:
Nitrogen
Phosphorus
Potassium
Micronutrients
Lemon plants often suffer from deficiencies of:
Zinc
Iron
Magnesium
Use micronutrient sprays when required.
Flowering and Fruiting in Kagzi Lemon
Grafted plants generally start fruiting within 1.5 to 3 years.
Healthy plants can flower multiple times a year.
During flowering:
Avoid water stress
Apply balanced nutrition
Ensure good sunlight
Best Tips to Get Maximum Fruits in Kagzi Lemon
1. Provide Full Sunlight
The plant needs at least 6 to 8 hours of sunlight daily.
2. Use Organic Fertilizers Regularly
Organic matter improves soil health and fruit production.
3. Prune Regularly
Remove weak and dry branches to encourage new growth.
4. Apply Potash
Potassium helps increase flowering and fruit size.
5. Maintain Proper Watering
Irregular watering leads to flower and fruit drop.
6. Use Neem Cake
Neem cake improves root health and protects from pests.
7. Mulching
Mulching conserves moisture and improves root activity.
8. Spray Seaweed Solution
Seaweed extracts encourage flowering and vigorous growth.
9. Improve Pollination
In container plants, hand pollination may help fruit setting.
10. Avoid Stress Conditions
Extreme dryness, excessive heat, and poor nutrition reduce fruiting.
Pruning and Training of Kagzi Lemon Plants
Pruning keeps the plant healthy and productive.
Best Time for Pruning
After harvesting
Before new growth season
Remove:
Dry branches
Diseased shoots
Crossing branches
Weak stems
Pruning increases air circulation and sunlight penetration.
Common Diseases and Their Control
1. Yellow Leaves
Causes
Nutrient deficiency
Waterlogging
Solution
Apply micronutrients
Improve drainage
2. Root Rot
Causes
Excess watering
Solution
Reduce irrigation
Use fungicides if necessary
3. Fruit Drop
Causes
Water stress
Poor nutrition
High temperature
Solution
Balanced watering
Potash application
Organic nutrition
4. Leaf Miner
This pest damages leaves.
Control
Neem oil spray
Remove affected leaves
5. Citrus Canker
Symptoms
Brown spots on leaves and fruits
Control
Copper fungicide spray
Remove infected branches
Summer Care for Kagzi Lemon Plants
Summer season requires extra attention.
Important Care Tips
Water during morning or evening
Use mulch
Protect young plants from extreme heat
Continue organic feeding
Mulching helps retain moisture.
Winter Care for Kagzi Lemon Plants
Cold weather may damage lemon plants.
Protection Tips
Cover small plants with cloth
Avoid cold winds
Water lightly in evenings
Keep plants in sunny locations
Why Flowers Fall Without Fruiting?
Many gardeners complain that flowers appear but fruits do not develop.
Main Reasons
Lack of nutrients
Insufficient sunlight
Water stress
Poor pollination
Excessive heat
Solutions
Provide balanced fertilizers
Maintain proper watering
Ensure sunlight exposure
Use organic growth boosters
Organic Farming of Kagzi Lemon
Organic lemon cultivation is becoming highly popular.
Organic Inputs
Cow dung manure
Vermicompost
Neem cake
Jeevamrit
Panchgavya
Neem oil spray
Organic farming improves soil fertility and fruit quality.
Improved Varieties of Kagzi Lemon
1. Ordinary Kagzi Lemon
Most common and widely grown variety.
2. Vikram Variety
Known for high production.
3. PKM Variety
Produces excellent quality fruits.
4. Sai Sharbati
Large juicy fruits with good market demand.
Importance of Mulching in Lemon Plants
Mulching means covering the soil around the plant using:
Dry leaves
Straw
Coconut husk
Grass
Benefits
Conserves moisture
Prevents weed growth
Protects roots
Reduces temperature stress
Homemade Organic Fertilizers for Lemon Plants
Banana Peel Fertilizer
Rich in potassium and excellent for flowering.
Tea Waste Compost
Improves soil fertility.
Eggshell Powder
Provides calcium.
Buttermilk Solution
Useful against fungal diseases.
Special Organic Solutions for Better Fruiting
Jeevamrit
Improves microbial activity in soil.
Vermiwash
Promotes rapid growth.
Seaweed Extract
Boosts flowering and fruiting.
Harvesting Kagzi Lemons
Harvest fruits when:
They attain proper size
Color changes from dark green to light green or yellowish
Do not keep overripe fruits on the plant for too long.
Precautions During Harvesting
Use pruning scissors
Avoid branch damage
Harvest during morning or evening
Keep fruits in shade
Market Demand and Business Potential
Kagzi lemon has year-round demand.
Demand increases significantly during summer.
Business Opportunities
Fresh fruit selling
Pickle industry
Juice industry
Nursery plant business
Online plant selling
Organic fruit farming
With proper management, lemon cultivation can become highly profitable.
Benefits of Growing Kagzi Lemon at Home
1. Fresh Chemical-Free Fruits
Homegrown lemons are healthier and fresher.
2. Decorative Plant
The plant looks beautiful in balconies and gardens.
3. Easy Maintenance
Compared to many fruit trees, lemon plants are easier to maintain.
4. Daily Household Use
Lemons are useful almost every day.
Uses of Kagzi Lemon
Kagzi lemon has multiple uses.
Lemon juice
Pickles
Salads
Soft drinks
Herbal remedies
Beauty products
Food industry
Common Mistakes While Growing Kagzi Lemon
1. Using Small Pots
Small containers restrict root growth.
2. Overwatering
Too much water causes root damage.
3. Lack of Sunlight
Poor sunlight reduces flowering.
4. Irregular Fertilization
Nutrient deficiency weakens the plant.
5. Ignoring Pruning
Old branches reduce productivity.
How to Increase Plant Growth Faster
If your lemon plant grows slowly:
Add organic fertilizer monthly
Improve sunlight exposure
Use neem cake
Loosen compact soil
Spray micronutrients
Remove dry branches
Can Kagzi Lemon Be Grown on Terrace?
Yes, Kagzi lemon is one of the best terrace gardening fruit plants.
Requirements
Large container
Proper sunlight
Regular watering
Periodic feeding
Even terrace-grown plants can produce excellent fruits.
Lifespan of Kagzi Lemon Plant
With proper care, Kagzi lemon plants can produce fruits for 15 to 20 years or even longer.
Regular pruning, fertilization, and disease control are essential.
Kitchen Gardening with Kagzi Lemon
Kagzi lemon is a perfect plant for kitchen gardens.
Why?
Compact growth
Useful throughout the year
Easy maintenance
High productivity
Attractive appearance
Importance of Proper Drainage
Good drainage is extremely important.
Waterlogged soil causes:
Root rot
Yellow leaves
Slow growth
Fruit drop
Always ensure excess water can escape easily.
Best Companion Plants for Lemon Trees
Some plants grow well near lemon trees.
Good Companion Plants
Marigold
Basil
Mint
Garlic
These plants help repel pests naturally.
How to Protect Lemon Plants from Pests Naturally
Neem Oil Spray
Neem oil is highly effective against many pests.
Garlic-Chili Spray
A homemade organic pest repellent.
Soap Water Spray
Useful against aphids and soft-bodied insects.
Why Kagzi Lemon Plants Stop Fruiting?
Sometimes plants stop producing fruits due to:
Old age
Lack of pruning
Nutrient deficiency
Poor sunlight
Pest attack
Regular maintenance helps restore productivity.
Commercial Farming Tips for Better Yield
For large-scale farming:
Use drip irrigation
Follow balanced fertilizer schedule
Perform regular pruning
Maintain plant spacing
Monitor pests regularly
Good farm management increases profit significantly.
Online Selling of Lemon Plants
Nowadays many nursery owners sell lemon plants online.
Online Selling Platforms
Nursery websites
Social media
WhatsApp business
E-commerce marketplaces
Healthy grafted plants have excellent customer demand.
Why Kagzi Lemon is Profitable for Nursery Business
Kagzi lemon plants are always in demand because:
Easy to grow
Fast fruiting
Suitable for pots
Useful for every household
Attractive plant appearance
Nursery owners can generate good income through lemon plant sales.
Expert Tips for Healthy Lemon Plants
Always use healthy grafted plants
Avoid overwatering
Feed plants regularly
Ensure proper sunlight
Monitor diseases early
Use organic fertilizers whenever possible
Repot container plants when roots become crowded
Conclusion
Kagzi lemon is one of the most useful and profitable citrus plants for home gardeners, nursery owners, and farmers. Its juicy fruits, strong aroma, easy maintenance, and high productivity make it a perfect choice for both commercial farming and household gardening.
Whether you grow it in pots, terraces, kitchen gardens, or farms, proper care can help the plant produce abundant fruits for many years. By maintaining good sunlight, balanced watering, timely pruning, organic nutrition, and disease management, you can enjoy healthy and highly productive lemon plants.
With the increasing demand for fresh lemons and gardening plants, Kagzi lemon cultivation and nursery business are becoming excellent income opportunities.
For high-quality plants and gardening products, contact:
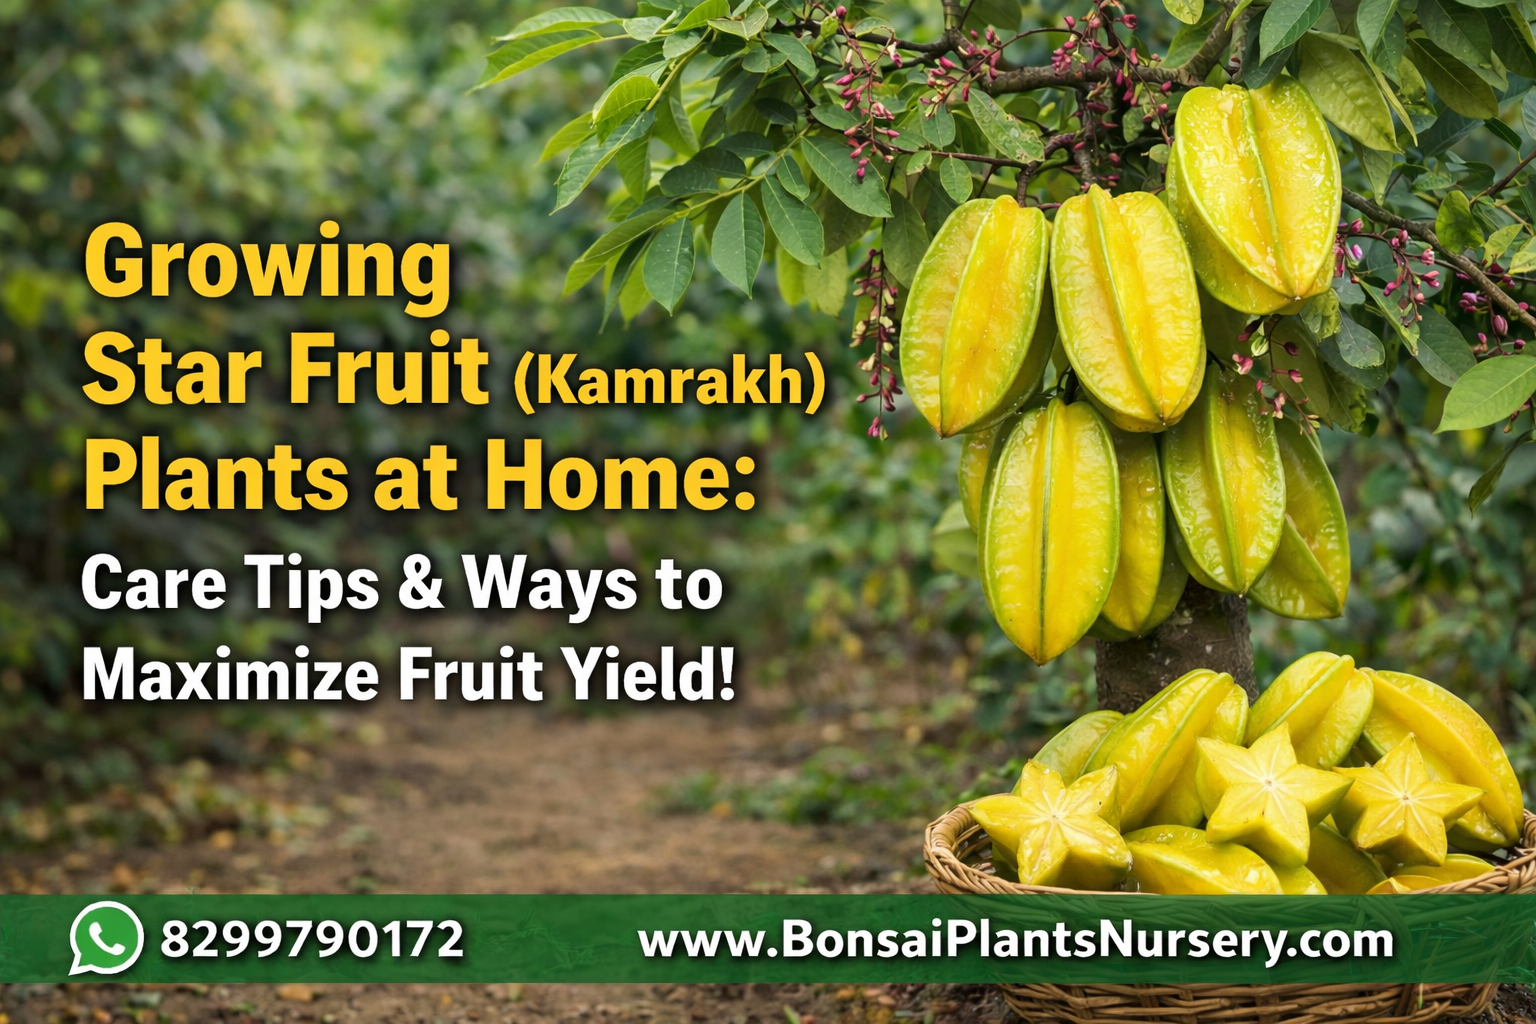
भारत में नींबू एक ऐसा फल है जिसका उपयोग लगभग हर घर में प्रतिदिन किया जाता है। चाहे सलाद हो, शिकंजी हो, अचार हो, चाट हो या फिर स्वास्थ्य से जुड़ी घरेलू नुस्खे—नींबू हर जगह उपयोगी माना जाता है। इनमें भी कागजी नींबू अपनी अधिक रसदार गुणवत्ता, पतले छिलके और तेज खुशबू के कारण सबसे अधिक लोकप्रिय है। आज के समय में कागजी नींबू की खेती और घरों में इसका पौधा लगाना दोनों ही तेजी से बढ़ रहे हैं क्योंकि इसकी मांग पूरे साल बनी रहती है।
यदि आप अपने घर, खेत, बगीचे या नर्सरी में कागजी नींबू का पौधा लगाना चाहते हैं और उससे अधिक से अधिक फल प्राप्त करना चाहते हैं, तो यह विस्तृत जानकारी आपके लिए बेहद उपयोगी साबित होगी। इस लेख में हम कागजी नींबू की विशेषताएं, पौधा लगाने का सही तरीका, मिट्टी की तैयारी, सिंचाई, खाद प्रबंधन, रोग नियंत्रण, फल झड़ने की समस्या और अधिक फल पाने के वैज्ञानिक उपायों के बारे में विस्तार से जानेंगे।
कागजी नींबू का पौधा कम जगह में भी अच्छी तरह लगाया जा सकता है। यह गमले, छत, किचन गार्डन और खेत—सभी जगह सफलतापूर्वक उगाया जा सकता है। सही देखभाल मिलने पर यह पौधा साल में कई बार फल देता है और लंबे समय तक उत्पादन करता है।
कागजी नींबू क्या है?
कागजी नींबू एक लोकप्रिय खट्टे फल वाली प्रजाति है जिसे अंग्रेजी में Lime कहा जाता है। इसका वैज्ञानिक नाम Citrus aurantifolia है। यह पौधा मुख्य रूप से गर्म जलवायु वाले क्षेत्रों में अच्छी तरह बढ़ता है। भारत में उत्तर प्रदेश, महाराष्ट्र, गुजरात, राजस्थान, मध्य प्रदेश और बिहार जैसे राज्यों में इसकी खेती बड़े पैमाने पर की जाती है।
कागजी नींबू का आकार सामान्य नींबू से थोड़ा छोटा होता है लेकिन इसमें रस अधिक मात्रा में होता है। इसका छिलका पतला और चमकदार होता है। इसका उपयोग पेय पदार्थ, मसाले, अचार, सौंदर्य उत्पाद और औषधीय उपयोगों में किया जाता है।
कागजी नींबू की सबसे बड़ी विशेषता यह है कि इसमें रस बहुत अधिक मात्रा में पाया जाता है। इसी कारण बाजार में इसकी मांग हमेशा बनी रहती है।
2. पतला छिलका
इसका छिलका पतला होता है जिससे फल का उपयोग आसान हो जाता है और रस अधिक निकलता है।
3. तेज सुगंध
इस नींबू की खुशबू बहुत आकर्षक होती है। इसका उपयोग कई प्रकार के पेय और खाद्य पदार्थों में किया जाता है।
4. बार-बार फल देने वाला पौधा
सही देखभाल मिलने पर कागजी नींबू साल में कई बार फल देता है। यह इसे घरेलू बागवानी के लिए बेहद उपयुक्त बनाता है।
5. कम जगह में खेती संभव
इसे गमले, ग्रो बैग और छोटे बगीचों में भी सफलतापूर्वक उगाया जा सकता है।
6. औषधीय गुणों से भरपूर
नींबू में विटामिन C, एंटीऑक्सीडेंट और खनिज तत्व पाए जाते हैं जो शरीर की रोग प्रतिरोधक क्षमता बढ़ाने में मदद करते हैं।
कागजी नींबू लगाने का सही समय
कागजी नींबू का पौधा लगाने के लिए सबसे अच्छा समय फरवरी-मार्च और जुलाई-अगस्त माना जाता है। बरसात के मौसम में पौधा तेजी से जड़ पकड़ता है। हालांकि उचित सिंचाई की व्यवस्था होने पर इसे अन्य मौसमों में भी लगाया जा सकता है।
यदि आप गमले में पौधा लगा रहे हैं तो अत्यधिक ठंड या बहुत अधिक गर्मी के समय पौधा लगाने से बचें।
कागजी नींबू के लिए उपयुक्त जलवायु
कागजी नींबू गर्म और आर्द्र जलवायु में सबसे अच्छा विकास करता है।
तापमान: 20°C से 35°C सबसे उपयुक्त
धूप: प्रतिदिन 6 से 8 घंटे धूप आवश्यक
वर्षा: मध्यम वर्षा वाले क्षेत्र अच्छे रहते हैं
पाला: अत्यधिक ठंड और पाला पौधे को नुकसान पहुंचा सकता है
यदि आपके क्षेत्र में अधिक ठंड पड़ती है तो सर्दियों में पौधे को सुरक्षित रखना जरूरी है।
कागजी नींबू के लिए मिट्टी कैसी होनी चाहिए?
कागजी नींबू लगभग सभी प्रकार की मिट्टी में उगाया जा सकता है लेकिन अच्छी जल निकासी वाली दोमट मिट्टी सबसे उपयुक्त मानी जाती है।
आदर्श मिट्टी की विशेषताएं
मिट्टी का pH: 5.5 से 7.5
पानी निकासी अच्छी हो
मिट्टी जैविक पदार्थों से भरपूर हो
मिट्टी बहुत कठोर या जलभराव वाली न हो
यदि मिट्टी भारी है तो उसमें रेत और गोबर की खाद मिलानी चाहिए।
कागजी नींबू का पौधा कैसे लगाएं?
1. पौधे का चयन
हमेशा अच्छी नर्सरी से स्वस्थ और ग्राफ्टेड पौधा खरीदें। ग्राफ्टेड पौधे जल्दी फल देना शुरू करते हैं और उनकी गुणवत्ता बेहतर होती है।
2. गड्ढे की तैयारी
यदि खेत में पौधा लगा रहे हैं तो 2 फीट लंबा, 2 फीट चौड़ा और 2 फीट गहरा गड्ढा तैयार करें।
गड्ढे में निम्न मिश्रण भरें:
20-25 किलो सड़ी गोबर खाद
नीम खली
बोनमील
थोड़ी रेत
उपजाऊ मिट्टी
3. पौधा लगाना
पौधे को सावधानी से पॉलीबैग से निकालें
जड़ों को नुकसान न पहुंचे
पौधे को सीधा रखें
मिट्टी दबाकर पौधे को स्थिर करें
तुरंत हल्की सिंचाई करें
गमले में कागजी नींबू लगाने का तरीका
आजकल लोग छत और बालकनी में भी कागजी नींबू उगा रहे हैं।
सही गमले का चयन
कम से कम 18 से 24 इंच का गमला लें
नीचे ड्रेनेज होल होना जरूरी है
मिट्टी मिश्रण
40% गार्डन मिट्टी
30% गोबर खाद
20% रेत
10% कोकोपीट या वर्मी कम्पोस्ट
पौधा लगाने के बाद
2-3 दिन हल्की छाया में रखें
फिर धीरे-धीरे धूप में रखें
कागजी नींबू की सिंचाई कैसे करें?
सही सिंचाई पौधे की वृद्धि और फल उत्पादन के लिए बेहद महत्वपूर्ण है।
गर्मियों में
3 से 4 दिन के अंतराल पर पानी दें
मिट्टी पूरी तरह सूखने न दें
सर्दियों में
7 से 10 दिन में सिंचाई पर्याप्त
बरसात में
जलभराव बिल्कुल न होने दें
अधिक पानी देने से जड़ सड़न की समस्या हो सकती है।
कागजी नींबू के लिए खाद और उर्वरक प्रबंधन
अधिक फल पाने के लिए पौधे को सही समय पर पोषण देना जरूरी है।
जैविक खाद
हर 2 से 3 महीने में:
गोबर खाद
वर्मी कम्पोस्ट
नीम खली
सरसों खली
रासायनिक उर्वरक
यदि व्यावसायिक खेती कर रहे हैं तो:
नाइट्रोजन
फास्फोरस
पोटाश
संतुलित मात्रा में दें।
माइक्रोन्यूट्रिएंट्स
नींबू में जिंक, आयरन और मैग्नीशियम की कमी अक्सर देखने को मिलती है। इसके लिए माइक्रोन्यूट्रिएंट स्प्रे उपयोगी रहता है।
कागजी नींबू में फूल और फल आने का समय
ग्राफ्टेड पौधे सामान्यतः 1.5 से 3 साल में फल देना शुरू कर देते हैं। सही देखभाल मिलने पर साल में कई बार फूल और फल आते हैं।
फूल आने के समय पौधे को अतिरिक्त पोषण और हल्की सिंचाई की जरूरत होती है।
अधिक फल पाने के सबसे प्रभावी उपाय
यदि आप चाहते हैं कि आपके कागजी नींबू के पौधे में भरपूर फल आएं तो निम्न उपाय बेहद उपयोगी हैं।
1. भरपूर धूप दें
नींबू के पौधे को प्रतिदिन कम से कम 6-8 घंटे धूप मिलनी चाहिए। धूप की कमी से फूल कम आते हैं।
2. समय पर कटाई-छंटाई करें
सूखी और कमजोर शाखाओं को हटाते रहें। इससे नई शाखाएं निकलती हैं और फल उत्पादन बढ़ता है।
3. फूल आने पर अतिरिक्त पोषण दें
फूल बनने के समय पोटाश और जैविक खाद देना लाभदायक होता है।
4. नीम खली का उपयोग
नीम खली जड़ों को मजबूत बनाती है और कीटों से सुरक्षा देती है।
5. जैविक तरल खाद का प्रयोग
जीवामृत, छाछ घोल और वर्मीवॉश जैसे जैविक घोल उपयोगी रहते हैं।
6. समय पर पानी दें
बहुत अधिक या बहुत कम पानी दोनों ही नुकसानदायक हैं।
7. परागण में सहायता करें
यदि पौधा गमले में है और फूल गिर रहे हैं तो हल्के ब्रश की मदद से परागण किया जा सकता है।
8. फल झड़ने से बचाव
पौधे में पोषक तत्वों की कमी न होने दें। नियमित देखभाल जरूरी है।
कागजी नींबू की कटाई-छंटाई कैसे करें?
कटाई-छंटाई पौधे को स्वस्थ और उत्पादक बनाए रखने के लिए जरूरी है।
कब करें?
फल तुड़ाई के बाद
सूखी शाखाएं दिखाई देने पर
क्या हटाएं?
सूखी शाखाएं
रोगग्रस्त भाग
जमीन की ओर बढ़ती शाखाएं
आपस में टकराने वाली शाखाएं
कटाई-छंटाई के बाद फफूंदनाशक का हल्का छिड़काव कर सकते हैं।
कागजी नींबू में लगने वाले प्रमुख रोग और नियंत्रण
1. पत्तियां पीली पड़ना
कारण
पोषक तत्वों की कमी
अधिक पानी
समाधान
माइक्रोन्यूट्रिएंट स्प्रे करें
जलभराव रोकें
2. जड़ सड़न
कारण
अत्यधिक सिंचाई
समाधान
मिट्टी की जल निकासी सुधारें
फफूंदनाशक उपयोग करें
3. फल गिरना
कारण
पानी की कमी
पोषण की कमी
अत्यधिक गर्मी
समाधान
नियमित सिंचाई
पोटाश और जैविक खाद दें
4. लीफ माइनर
यह कीट पत्तियों को नुकसान पहुंचाता है।
नियंत्रण
नीम तेल स्प्रे करें
प्रभावित पत्तियां हटाएं
5. साइट्रस कैंकर
लक्षण
पत्तियों और फलों पर धब्बे
नियंत्रण
कॉपर आधारित फफूंदनाशक
रोगग्रस्त भाग हटाएं
कागजी नींबू के पौधे की देखभाल गर्मियों में
गर्मियों में नींबू के पौधे को विशेष देखभाल की आवश्यकता होती है।
जरूरी बातें
सुबह या शाम पानी दें
मल्चिंग करें
तेज धूप में छोटे पौधों को सुरक्षा दें
जैविक खाद देते रहें
मल्चिंग से मिट्टी की नमी लंबे समय तक बनी रहती है।
सर्दियों में कागजी नींबू की देखभाल
सर्दियों में अत्यधिक ठंड पौधे को नुकसान पहुंचा सकती है।
बचाव उपाय
शाम के समय हल्की सिंचाई करें
छोटे पौधों को कपड़े से ढकें
ठंडी हवाओं से बचाएं
कागजी नींबू में फूल झड़ने की समस्या और समाधान
कई बार पौधे में फूल तो खूब आते हैं लेकिन फल नहीं बनते।
मुख्य कारण
पोषण की कमी
पानी की अनियमितता
धूप की कमी
अत्यधिक गर्मी
समाधान
संतुलित खाद दें
नियमित सिंचाई करें
पौधे को धूप वाली जगह रखें
जैविक तरल खाद का उपयोग करें
जैविक तरीके से कागजी नींबू की खेती
आजकल लोग रसायन मुक्त खेती की ओर तेजी से बढ़ रहे हैं। जैविक तरीके से उगाए गए नींबू की मांग भी अधिक होती है।
जैविक खेती के प्रमुख उपाय
गोबर खाद का उपयोग
वर्मी कम्पोस्ट
नीम खली
जीवामृत
पंचगव्य
नीम तेल स्प्रे
इससे मिट्टी की गुणवत्ता भी बेहतर रहती है।
कागजी नींबू की उन्नत किस्में
भारत में कागजी नींबू की कई उन्नत किस्में उपलब्ध हैं।
1. कागजी नींबू साधारण
सबसे अधिक लोकप्रिय किस्म।
2. विक्रम
अधिक उत्पादन देने वाली किस्म।
3. पीकेएम
अच्छी गुणवत्ता और अधिक फल उत्पादन।
4. साई शरबती
रसदार और बड़े आकार के फल।
कागजी नींबू की खेती से कमाई
कागजी नींबू की मांग पूरे वर्ष बनी रहती है। सही तरीके से खेती करने पर किसान अच्छी आय प्राप्त कर सकते हैं।
कमाई के प्रमुख स्रोत
ताजा फल बिक्री
अचार उद्योग
जूस उद्योग
नर्सरी पौधे बिक्री
ऑनलाइन बिक्री
यदि पौधों की अच्छी देखभाल की जाए तो प्रति पौधा काफी उत्पादन प्राप्त किया जा सकता है।
घर में कागजी नींबू लगाने के फायदे
1. ताजा और शुद्ध फल
घर पर उगाए गए नींबू रसायन मुक्त होते हैं।
2. सजावटी पौधा
यह पौधा घर की सुंदरता बढ़ाता है।
3. स्वास्थ्य लाभ
नींबू विटामिन C का अच्छा स्रोत है।
4. कम देखभाल
अन्य फलों की तुलना में इसकी देखभाल अपेक्षाकृत आसान है।
कागजी नींबू के उपयोग
कागजी नींबू का उपयोग कई प्रकार से किया जाता है।
शिकंजी
सलाद
अचार
चाय
घरेलू उपचार
सौंदर्य उत्पाद
खाद्य उद्योग
कागजी नींबू से जुड़े महत्वपूर्ण सुझाव
हमेशा स्वस्थ पौधा खरीदें
जलभराव न होने दें
समय पर खाद दें
धूप की उचित व्यवस्था रखें
नियमित निरीक्षण करें
रोग दिखाई देने पर तुरंत उपचार करें
कागजी नींबू की खेती में होने वाली सामान्य गलतियां
1. बहुत छोटे गमले का उपयोग
छोटे गमले में पौधे की जड़ें ठीक से विकसित नहीं हो पातीं।
2. अधिक पानी देना
इससे जड़ें सड़ सकती हैं।
3. धूप की कमी
धूप न मिलने पर फल कम आते हैं।
4. समय पर खाद न देना
पोषक तत्वों की कमी से पौधा कमजोर हो जाता है।
5. कटाई-छंटाई न करना
पुरानी शाखाएं उत्पादन कम कर देती हैं।
कागजी नींबू के पौधे में तेजी से वृद्धि कैसे करें?
यदि आपका पौधा धीरे बढ़ रहा है तो निम्न उपाय करें:
हर महीने जैविक खाद दें
मिट्टी को भुरभुरी रखें
धूप की मात्रा बढ़ाएं
नीम खली डालें
सूखी शाखाएं हटाएं
समय-समय पर माइक्रोन्यूट्रिएंट स्प्रे करें
क्या कागजी नींबू को छत पर उगाया जा सकता है?
हाँ, बिल्कुल। छत पर कागजी नींबू बहुत सफलतापूर्वक उगाया जा सकता है।
ध्यान रखने योग्य बातें
बड़ा गमला लें
नियमित सिंचाई करें
तेज धूप उपलब्ध हो
हर 2 महीने में खाद दें
छत पर उगाए गए पौधे से भी भरपूर फल प्राप्त किए जा सकते हैं।
कागजी नींबू का पौधा कितने साल तक फल देता है?
सही देखभाल मिलने पर कागजी नींबू का पौधा 15 से 20 साल या उससे अधिक समय तक फल दे सकता है। नियमित खाद, कटाई-छंटाई और रोग नियंत्रण जरूरी है।
कागजी नींबू के पौधे में मल्चिंग का महत्व
मल्चिंग का मतलब पौधे के आसपास सूखी पत्तियां, भूसा या नारियल छिलका बिछाना है।
लाभ
मिट्टी में नमी बनी रहती है
खरपतवार कम उगते हैं
जड़ों की सुरक्षा होती है
गर्मियों में तापमान नियंत्रित रहता है
कागजी नींबू के पौधे के लिए घरेलू जैविक खाद
आप घर पर भी आसानी से जैविक खाद बना सकते हैं।
केले के छिलके की खाद
पोटाश से भरपूर होती है और फूल-फल बढ़ाने में मदद करती है।
चायपत्ती खाद
मिट्टी की उर्वरता बढ़ाती है।
अंडे के छिलके
कैल्शियम प्रदान करते हैं।
छाछ घोल
फफूंद नियंत्रण में उपयोगी।
अधिक नींबू पाने के लिए विशेष जैविक घोल
जीवामृत
मिट्टी में सूक्ष्मजीवों की संख्या बढ़ाता है।
वर्मीवॉश
पौधे की वृद्धि तेज करता है।
समुद्री शैवाल घोल
फूल और फल बढ़ाने में सहायक।
कागजी नींबू की तुड़ाई कब करें?
जब फल हल्के हरे से पीले रंग में बदलने लगें और आकार पूरा हो जाए तो तुड़ाई की जा सकती है।
बहुत अधिक देर तक फल पौधे पर छोड़ने से गुणवत्ता प्रभावित हो सकती है।
नींबू तोड़ते समय सावधानियां
कैंची का उपयोग करें
शाखा को नुकसान न पहुंचाएं
सुबह या शाम तुड़ाई करें
फलों को छाया में रखें
कागजी नींबू की मार्केट डिमांड
कागजी नींबू की मांग पूरे साल रहती है लेकिन गर्मियों में इसकी कीमत और मांग दोनों बढ़ जाती हैं।
ऑनलाइन प्लेटफॉर्म और सोशल मीडिया के माध्यम से भी नींबू और पौधों की बिक्री तेजी से बढ़ रही है।
किचन गार्डन में कागजी नींबू क्यों लगाना चाहिए?
यदि आप घर में किचन गार्डन बनाना चाहते हैं तो कागजी नींबू एक बेहतरीन विकल्प है।
कारण
कम जगह में उगता है
सालभर उपयोगी
कम देखभाल
सुंदर पौधा
स्वास्थ्य के लिए लाभकारी
बच्चों और परिवार के लिए उपयोगी पौधा
कागजी नींबू का पौधा बच्चों को बागवानी सिखाने के लिए भी अच्छा है। यह जल्दी बढ़ता है और फल आने पर बच्चों में उत्साह पैदा करता है।
निष्कर्ष
कागजी नींबू एक अत्यंत उपयोगी, लाभदायक और आसानी से उगाया जाने वाला पौधा है। चाहे आप इसे घर की छत, बालकनी, किचन गार्डन या खेत में लगाएं—सही देखभाल मिलने पर यह भरपूर उत्पादन देता है। इसकी सबसे बड़ी खासियत यह है कि यह कम जगह में भी सफलतापूर्वक उगाया जा सकता है और लंबे समय तक फल देता है।
यदि आप स्वस्थ और रसदार कागजी नींबू प्राप्त करना चाहते हैं तो सही मिट्टी, पर्याप्त धूप, संतुलित सिंचाई, नियमित खाद और समय पर कटाई-छंटाई पर विशेष ध्यान दें। जैविक तरीकों का उपयोग करके आप रसायन मुक्त और अधिक गुणवत्ता वाले फल प्राप्त कर सकते हैं।
आज के समय में कागजी नींबू की खेती और पौधों की बिक्री दोनों ही लाभदायक व्यवसाय बनते जा रहे हैं। इसलिए यदि आप बागवानी के शौकीन हैं या खेती से अतिरिक्त आय प्राप्त करना चाहते हैं, तो कागजी नींबू का पौधा जरूर लगाएं।
उच्च गुणवत्ता वाले पौधे खरीदने के लिए संपर्क करें:
Best Plants to Grow During Summer for a Healthy and Beautiful Garden
May and June are among the hottest months in India, but they are also one of the most important seasons for planting many fruit plants, vegetables, flowering plants, herbs, and ornamental plants. If the right plants are selected and proper care is given, these months can help establish a strong and productive garden before the monsoon season begins.
Plants grown during May–June benefit greatly from the early rains of the monsoon, which helps roots establish quickly and promotes faster growth.
Many gardening enthusiasts and farmers often ask:
Which plants should be planted in May and June?
How should plants be cared for during summer?
Which plants grow well in hot weather?
Which fruit plants are best for this season?
How can plants be protected from extreme heat?
In this detailed guide, you will learn:
Best fruit plants for May–June plantation
Vegetables suitable for summer gardening
Flowering and ornamental plants for hot weather
Proper watering techniques
Fertilizer recommendations
Organic plant care methods
Professional gardening tips for better growth and yield
Plants established during May and June become stronger before the rainy season arrives. Their roots spread rapidly, helping them survive and grow better throughout the year.
Benefits of Planting During May–June
Faster root development
Better monsoon growth
Stronger plant establishment
Higher survival rate
Improved long-term productivity
Important Things to Remember Before Planting
1. Plant During Morning or Evening
Avoid planting during the afternoon because extreme heat can stress young plants.
2. Prepare Healthy Soil
Good soil is the foundation of successful gardening.
Ideal Soil Mix
50% garden soil
30% organic compost or cow dung manure
20% sand or cocopeat
This mixture improves drainage, moisture retention, and root growth.
3. Use Mulching
Mulching helps protect plants from summer heat.
Best Mulching Materials
Dry leaves
Straw
Coconut husk
Dry grass
4. Regular Watering is Essential
Summer plants need more attention because water evaporates quickly in high temperatures.
Best Fruit Plants to Grow in May–June
1. Mango Plant
Summer is one of the best seasons to plant mango trees.
Benefits of Mango Plantation
Long lifespan
High market demand
Excellent long-term investment
Low maintenance after establishment
How to Plant Mango Trees
Pit Preparation
Dig a 3×3 feet pit
Add organic compost and neem cake
Spacing
Maintain 10–15 feet distance between plants.
Mango Plant Care
Watering
Water 2–3 times weekly during the initial growth stage.
Fertilizers
Cow dung manure
Vermicompost
Bone meal
Professional Tips
Apply mulch around the plant
Use shade nets for young plants
Prune regularly for better branching
2. Guava Plant
Guava is one of the easiest and fastest fruit plants to grow.
Why Grow Guava?
Fast fruiting
Multiple harvests annually
Suitable for small spaces
High market demand
Planting Method
Prepare a 2×2 feet pit
Use organic-rich soil
Choose a sunny location
Guava Plant Care
Water regularly
Add compost monthly
Remove dry branches
Tips for More Fruits
Regular pruning
Potash fertilizer during flowering
Neem oil spray for pest control
3. Lemon Plant
Lemon plants are highly useful and profitable because lemons are needed throughout the year.
Benefits
Continuous demand
Suitable for pots and ground planting
Year-round production
Planting Method
Use 18–24 inch pots or open ground
Ensure proper drainage
Lemon Plant Care
Regular watering
Full sunlight
Monthly organic fertilizer
Professional Tips
Maintain soil moisture during flowering
Use micronutrient sprays
4. Papaya Plant
May–June is ideal for papaya plantation.
Advantages
Fast fruit production
High-profit crop
Suitable for small areas
Planting Method
Well-drained soil
Maintain 6–8 feet spacing
Papaya Care
Avoid waterlogging
Use balanced fertilizers
Professional Tips
Remove male plants
Use organic manure regularly
5. Dragon Fruit Plant
Dragon fruit farming has become one of the most profitable modern farming businesses.
Benefits
Low water requirement
Premium market price
Long productive lifespan
Planting Method
Use cement pole support system
Sandy soil works best
Dragon Fruit Care
Light irrigation
Full sunlight required
Professional Tips
Use organic mulch
Install drip irrigation system
Best Vegetable Plants to Grow in May–June
6. Okra (Lady Finger)
Okra grows rapidly in hot weather.
Planting Method
Sow seeds directly
Maintain 1-foot spacing
Care Tips
Water regularly
Remove weeds frequently
Professional Tips
Use organic fertilizer
Harvest regularly for continuous production
7. Bottle Gourd
Bottle gourd performs well in both summer and monsoon.
Planting Method
Provide support for climbing vines
Use fertile organic soil
Plant Care
Regular watering
Periodic pruning
8. Bitter Gourd
Bitter gourd is highly nutritious and profitable.
Benefits
Strong market demand
Medicinal value
Care Tips
Use support structure
Requires good sunlight
9. Tomato Plant
Heat-tolerant tomato varieties can also be planted during May–June.
Tomato Care
Use mulching
Protect from extreme heat
10. Chilli Plant
Chilli plants grow very well in warm weather.
Professional Tips
Pinch top shoots for bushier growth
Use organic liquid fertilizers
Best Flowering Plants for May–June
11. Hibiscus Plant
Benefits
Flowers throughout the year
Low maintenance
12. Rose Plant
Care Tips
Morning sunlight is ideal
Regular pruning improves flowering
13. Jasmine Plant
Produces fragrant flowers during summer.
14. Marigold Plant
Benefits
Helps control pests naturally
Used for decoration and religious purposes
Best Ornamental Plants for Summer
15. Areca Palm
Excellent indoor and outdoor decorative plant.
16. Snake Plant
Requires very little water and maintenance.
17. Money Plant
Perfect for both indoor and outdoor spaces.
18. Croton Plant
Known for colorful decorative leaves.
Best Medicinal Plants for May–June
19. Tulsi (Holy Basil)
Benefits
Medicinal value
Spiritual importance
Easy maintenance
20. Aloe Vera
Benefits
Useful for skin and health
Requires less water
How to Care for Plants During Summer
1. Water Plants in Morning or Evening
Avoid afternoon watering because:
Water evaporates quickly
Plants may experience stress
2. Use Shade Nets
Especially important for young plants.
3. Mulching is Very Important
Benefits of Mulching
Keeps soil cool
Retains moisture
Reduces weed growth
4. Use Liquid Fertilizers
Liquid fertilizers work faster during summer.
Recommended Organic Liquid Fertilizers
Compost tea
Cow dung liquid manure
Vermiwash
Seaweed fertilizer
How to Protect Plants from Summer Heat
Important Tips
Water regularly
Use shade nets
Apply mulch
Loosen soil regularly
Best Time to Apply Fertilizers
Apply fertilizers:
During evening hours
After watering plants
Best Organic Fertilizers for Summer Plants
Recommended Organic Fertilizers
Cow dung manure
Vermicompost
Neem cake
Bone meal
Mustard cake fertilizer
Common Summer Plant Problems
Typical Issues
Leaf burning
Fungal infections
Pest attacks
Wilting
Natural Pest Control Methods
Neem Oil Spray
One of the safest and most effective organic pest control solutions.
Buttermilk Spray
Helps prevent fungal diseases naturally.
Garlic-Chilli Spray
Useful for controlling insects and pests.
Terrace Garden Care During May–June
Concrete rooftops become extremely hot during summer.
Problems
Pots heat up quickly
Soil dries faster
Root stress increases
Solutions
Use white grow bags
Double potting method
Mulching
Temporary shading
How to Select Healthy Plants from Nursery
Signs of Healthy Plants
Green leaves
Strong stems
Disease-free growth
Healthy roots
Benefits of Buying Plants from a Trusted Nursery
Better survival rate
Faster growth
Early flowering and fruiting
Disease resistance
Why Drip Irrigation is Important in Summer
Advantages
Saves water
Maintains proper moisture
Reduces labor
Improves plant health
Best Kitchen Garden Plan for May–June
Fruit Plants
Lemon
Guava
Papaya
Vegetables
Okra
Chilli
Bottle gourd
Herbs
Mint
Tulsi
Coriander
Professional Gardening Tips
1. Companion Planting
Examples:
Tomato + Basil
Chilli + Coriander
This helps reduce pests naturally.
2. Regular Pruning
Encourages fresh growth and improves productivity.
3. Focus on Organic Gardening
Organic gardening produces healthier and safer vegetables and fruits.
Common Mistakes Beginners Make
Overwatering
Using poor-quality soil
Ignoring sunlight needs
Choosing very small pots
Lack of mulching
Avoiding these mistakes can greatly improve plant growth.
Final Thoughts
May and June are among the best months to establish a strong and productive garden. With the right plants and proper care, you can enjoy healthy growth, beautiful flowers, and excellent fruit and vegetable production throughout the year.
The key factors for success are:
Healthy soil
Proper watering
Mulching
Organic fertilizers
Quality plants
If you are looking for high-quality fruit plants, terrace garden plants, decorative plants, exotic plants, or professional gardening guidance, contact:
Bonsai Plants Nursery
🌿 Fast Growing Quality Plants 🌿 Fruit Plants | Terrace Garden Plants | Decorative Plants 🌿 Wholesale & Retail Available
मई और जून का महीना भारत में गर्मी का सबसे महत्वपूर्ण समय माना जाता है। इस मौसम में तापमान अधिक होता है, लेकिन यही समय कई फलदार, फूलदार, सब्जी और सजावटी पौधों को लगाने के लिए भी सबसे अच्छा होता है। यदि सही पौधों का चयन किया जाए और उनकी उचित देखरेख की जाए तो मानसून शुरू होते ही पौधों की वृद्धि तेजी से होने लगती है और आने वाले महीनों में शानदार परिणाम मिलते हैं।
बहुत से लोग यह जानना चाहते हैं:
मई–जून में कौन से पौधे लगाना सबसे अच्छा रहता है?
गर्मियों में पौधों की देखभाल कैसे करें?
कौन से पौधे कम पानी में अच्छे बढ़ते हैं?
फलदार पौधों के लिए कौन सा मौसम सही है?
गर्मी में पौधों को सूखने से कैसे बचाएं?
इस विस्तृत लेख में हम मई–जून के महीने में लगाए जाने वाले मुख्य पौधों, उनकी देखरेख, खाद, सिंचाई, रोग नियंत्रण और अधिक उत्पादन की प्रोफेशनल तकनीकों के बारे में विस्तार से जानेंगे।
गुणवत्ता वाले पौधे और प्रोफेशनल गार्डनिंग सलाह के लिए संपर्क करें: 🌿 www.bonsaiplantsnursery.com 📱 WhatsApp: 8299790172
मई–जून में पौधे लगाने का सही समय क्यों महत्वपूर्ण है?
मई और जून के दौरान लगाए गए पौधों को मानसून की शुरुआती बारिश का फायदा मिलता है। इस समय पौधों की जड़ें तेजी से विकसित होती हैं और पौधा जल्दी मजबूत बनता है।
इस मौसम के फायदे
जड़ों की तेजी से वृद्धि
मानसून में बेहतर विकास
पौधों की अच्छी पकड़
लंबे समय तक स्वस्थ वृद्धि
कम transplant shock
मई–जून में पौधे लगाते समय किन बातों का ध्यान रखें?
1. सुबह या शाम में पौधे लगाएं
दोपहर की तेज धूप में पौधे लगाने से पौधे कमजोर हो सकते हैं।
2. मिट्टी तैयार करें
अच्छी मिट्टी पौधों की सफलता की सबसे बड़ी कुंजी है।
आदर्श मिट्टी मिश्रण
50% गार्डन सॉयल
30% गोबर खाद या वर्मी कम्पोस्ट
20% रेत या कोकोपीट
3. मल्चिंग करें
मल्चिंग मिट्टी में नमी बनाए रखने में मदद करती है।
मल्चिंग के लिए उपयोग करें
सूखी पत्तियां
भूसा
नारियल भूसी
सूखी घास
4. नियमित सिंचाई जरूरी
गर्मियों में पौधों को अधिक ध्यान की जरूरत होती है।
मई–जून में लगाए जाने वाले मुख्य फलदार पौधे
1. आम का पौधा (Mango Plant)
गर्मी का मौसम आम लगाने के लिए बहुत अच्छा माना जाता है।
आम लगाने के फायदे
लंबी उम्र वाला पौधा
बाजार में हमेशा मांग
कम देखरेख में अच्छा उत्पादन
लगाने की विधि
गड्ढे की तैयारी
3×3 फीट गड्ढा खोदें
उसमें गोबर खाद और नीम खली मिलाएं
दूरी
10–15 फीट की दूरी रखें
देखरेख
पानी
शुरुआती दिनों में सप्ताह में 2–3 बार पानी दें।
खाद
गोबर खाद
बोनमील
वर्मी कम्पोस्ट
प्रोफेशनल टिप्स
पौधे के चारों ओर मल्चिंग करें
तेज धूप में shade net उपयोग करें
समय-समय पर pruning करें
2. अमरूद का पौधा (Guava Plant)
अमरूद तेजी से बढ़ने वाला और जल्दी फल देने वाला पौधा है।
क्यों लगाएं?
कम जगह में खेती संभव
साल में कई बार फल
कम रखरखाव
लगाने की विधि
2×2 फीट गड्ढा
अच्छी जैविक मिट्टी
धूप वाली जगह
देखभाल
नियमित पानी
महीने में एक बार जैविक खाद
सूखी शाखाएं हटाएं
ज्यादा फल पाने की टिप्स
pruning जरूरी
फूल आने पर पोटाश दें
नीम ऑयल स्प्रे करें
3. नींबू का पौधा (Lemon Plant)
नींबू का पौधा पूरे साल उपयोगी रहता है।
फायदे
हर मौसम में मांग
गमले में भी उगाया जा सकता है
लगातार उत्पादन
लगाने की विधि
18–24 इंच गमला या जमीन
जल निकासी अच्छी हो
देखभाल
नियमित सिंचाई
धूप जरूरी
हर महीने खाद दें
प्रोफेशनल टिप्स
फूल गिरने से बचाने के लिए नमी बनाए रखें
माइक्रो न्यूट्रिएंट स्प्रे करें
4. पपीता (Papaya)
मई–जून पपीता लगाने के लिए आदर्श समय है।
फायदे
जल्दी फल
हाई प्रॉफिट
कम जगह में खेती
लगाने की विधि
अच्छी drainage वाली मिट्टी
6–8 फीट दूरी
देखरेख
पानी भराव से बचाएं
संतुलित खाद दें
अधिक उत्पादन के टिप्स
नर पौधे हटाएं
जैविक खाद उपयोग करें
5. ड्रैगन फ्रूट (Dragon Fruit)
ड्रैगन फ्रूट आधुनिक हाई प्रॉफिट खेती का हिस्सा बन चुका है।
फायदे
कम पानी
ऊंची बाजार कीमत
लंबे समय तक उत्पादन
लगाने की विधि
सीमेंट पोल सिस्टम
रेतीली मिट्टी बेहतर
देखभाल
हल्की सिंचाई
धूप जरूरी
प्रोफेशनल टिप्स
जैविक मल्चिंग करें
drip irrigation उपयोग करें
मई–जून में लगाए जाने वाले मुख्य सब्जी पौधे
6. भिंडी (Okra)
गर्मी में तेजी से बढ़ती है।
लगाने की विधि
सीधे बीज बोएं
1 फीट दूरी रखें
देखभाल
नियमित पानी
खरपतवार हटाएं
अधिक उत्पादन के उपाय
जैविक खाद
समय पर कटाई
7. लौकी (Bottle Gourd)
गर्मी और मानसून दोनों में अच्छी बढ़ती है।
लगाने की विधि
बेल के लिए support दें
जैविक मिट्टी उपयोग करें
देखरेख
पानी नियमित दें
pruning करें
8. करेला (Bitter Gourd)
फायदे
औषधीय गुण
बाजार में अच्छी मांग
देखभाल
बेल को support दें
धूप जरूरी
9. टमाटर (Tomato)
कुछ गर्मी सहनशील varieties मई–जून में लगाई जा सकती हैं।
देखरेख
mulch करें
ज्यादा गर्मी से बचाएं
10. मिर्च (Chilli)
मिर्च गर्म मौसम में अच्छी बढ़ती है।
प्रोफेशनल टिप्स
top pinching करें
जैविक liquid fertilizer दें
मई–जून में लगाए जाने वाले फूलदार पौधे
11. गुड़हल (Hibiscus)
फायदे
पूरे साल फूल
कम रखरखाव
12. गुलाब (Rose)
देखभाल
सुबह धूप
नियमित pruning
13. मोगरा (Jasmine)
गर्मी में शानदार खुशबू वाले फूल देता है।
14. गेंदा (Marigold)
फायदे
कीट नियंत्रण में मदद
पूजा और सजावट में उपयोग
मई–जून में लगाए जाने वाले सजावटी पौधे
15. एरेका पाम (Areca Palm)
घर और ऑफिस सजावट के लिए बेहतरीन।
16. स्नेक प्लांट (Snake Plant)
कम पानी में बढ़ता है।
17. मनी प्लांट (Money Plant)
इनडोर और आउटडोर दोनों के लिए अच्छा।
18. क्रोटन (Croton)
रंगीन पत्तियों वाला आकर्षक पौधा।
मई–जून में लगाए जाने वाले औषधीय पौधे
19. तुलसी (Tulsi)
फायदे
धार्मिक महत्व
औषधीय गुण
20. एलोवेरा (Aloe Vera)
फायदे
त्वचा और स्वास्थ्य के लिए उपयोगी
कम पानी में बढ़ता है
गर्मियों में पौधों की देखरेख कैसे करें?
1. सुबह और शाम पानी दें
दोपहर में पानी देने से:
पानी जल्दी उड़ जाता है
पौधे stress में आ सकते हैं
2. Shade Net का उपयोग करें
विशेषकर छोटे पौधों के लिए।
3. Mulching जरूर करें
फायदे
मिट्टी ठंडी रहती है
नमी बनी रहती है
खरपतवार कम होते हैं
4. Liquid Fertilizer दें
गर्मी में liquid fertilizers जल्दी असर करते हैं।
उपयोग करें
गोबर खाद घोल
seaweed fertilizer
vermiwash
गर्मियों में पौधों को सूखने से कैसे बचाएं?
महत्वपूर्ण उपाय
सुबह सिंचाई
shade net
mulch
गमले की मिट्टी ढीली करें
पौधों में खाद कब दें?
सबसे अच्छा समय
शाम के समय
पानी देने के बाद
मई–जून में कौन सी जैविक खाद सबसे अच्छी है?
1. गोबर खाद
2. वर्मी कम्पोस्ट
3. नीम खली
4. बोनमील
5. सरसों खली
गर्मियों में पौधों को रोगों से कैसे बचाएं?
सामान्य समस्याएं
पत्तियां जलना
फंगल रोग
कीट हमला
प्राकृतिक उपाय
नीम ऑयल स्प्रे
सबसे सुरक्षित और प्रभावी।
छाछ स्प्रे
फंगल रोग रोकता है।
लहसुन-मिर्च स्प्रे
कीट नियंत्रण में मदद।
टेरेस गार्डन में मई–जून की विशेष देखरेख
गमले जल्दी गर्म क्यों होते हैं?
कंक्रीट की छत गर्मी को बढ़ाती है।
समाधान
सफेद grow bags
double potting
mulch
shading
मई–जून में पौधे खरीदते समय किन बातों का ध्यान रखें?
स्वस्थ पौधे की पहचान
हरी पत्तियां
मजबूत तना
रोग मुक्त पौधा
अच्छी nursery से पौधे लेने के फायदे
healthy plants
fast growth
better survival
जल्दी फल और फूल
गर्मियों में drip irrigation क्यों जरूरी है?
फायदे
पानी की बचत
पौधे स्वस्थ रहते हैं
समय की बचत
Kitchen Garden के लिए मई–जून का सबसे अच्छा प्लान
फलदार पौधे
नींबू
अमरूद
पपीता
सब्जियां
भिंडी
मिर्च
लौकी
हर्ब्स
पुदीना
तुलसी
धनिया
प्रोफेशनल गार्डनिंग टिप्स
1. Companion Planting
उदाहरण:
टमाटर + तुलसी
मिर्च + धनिया
2. नियमित pruning
नई growth बढ़ती है।
3. जैविक खेती अपनाएं
स्वस्थ और सुरक्षित उत्पादन।
शुरुआत करने वाले लोग कौन सी गलतियां करते हैं?
ज्यादा पानी देना
छोटे गमले उपयोग करना
धूप की अनदेखी
खराब मिट्टी
निष्कर्ष
मई–जून का मौसम सही पौधे लगाने और मजबूत गार्डन तैयार करने का सबसे अच्छा समय है। यदि इस समय सही पौधे लगाए जाएं और उनकी उचित देखरेख की जाए तो आने वाले महीनों में शानदार growth, फल और फूल मिल सकते हैं।
सबसे महत्वपूर्ण बातें:
अच्छी मिट्टी तैयार करें
नियमित सिंचाई करें
mulch उपयोग करें
जैविक खाद दें
quality plants चुनें
यदि आप गुणवत्ता वाले फलदार पौधे, सजावटी पौधे, terrace garden plants, exotic plants या professional gardening guidance चाहते हैं तो संपर्क करें:
Bonsai Plants Nursery
🌿 Fast Growing Quality Plants 🌿 Fruit Plants | Terrace Garden Plants | Decorative Plants 🌿 Wholesale & Retail Available
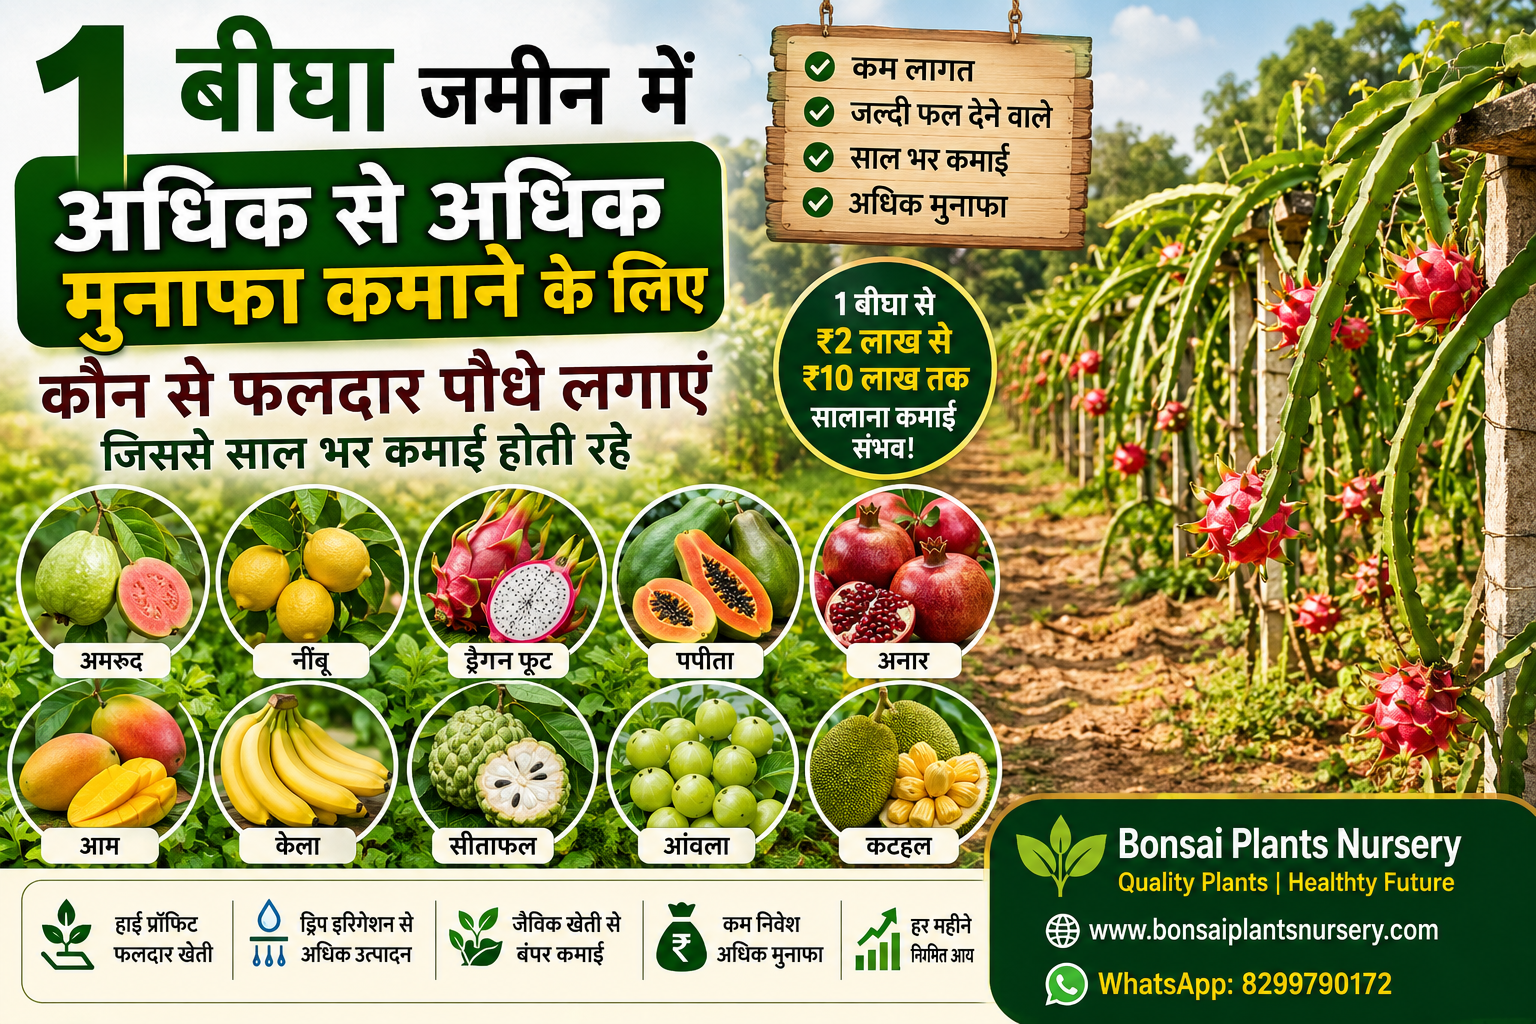
आज के समय में खेती केवल पारंपरिक अनाज उगाने तक सीमित नहीं रह गई है। बढ़ती जनसंख्या, बदलती जीवनशैली और फल-फूलों की बढ़ती मांग ने फलदार पौधों की खेती को बेहद लाभदायक बना दिया है। यदि आपके पास केवल 1 बीघा जमीन है, तब भी आप सही योजना और सही फलदार पौधों के चयन से लाखों रुपये तक की कमाई कर सकते हैं।
बहुत से किसान और नए निवेशक यह जानना चाहते हैं कि:
1 बीघा जमीन में कौन से फलदार पौधे सबसे ज्यादा लाभ देंगे?
कौन से पौधे कम देखरेख में ज्यादा उत्पादन देते हैं?
साल भर लगातार कमाई कैसे हो?
कौन से पौधे जल्दी फल देना शुरू करते हैं?
कौन सी खेती भविष्य में सबसे ज्यादा मुनाफा दे सकती है?
इस विस्तृत लेख में हम इन्हीं सभी सवालों के जवाब विस्तार से जानेंगे।
1_Bigha_Land_to_Earn_Maximum_Profit
गुणवत्ता वाले फलदार पौधों और प्रोफेशनल गार्डनिंग सलाह के लिए संपर्क करें: 🌿 www.bonsaiplantsnursery.com 📱 WhatsApp: 8299790172
1 बीघा जमीन में खेती करते समय किन बातों का ध्यान रखें?
फलदार पौधे लगाने से पहले सही योजना बनाना बहुत जरूरी है।
1. मिट्टी की जांच
सबसे पहले मिट्टी की जांच कराएं:
मिट्टी का pH
पानी रोकने की क्षमता
जैविक पदार्थों की मात्रा
अधिकांश फलदार पौधे 6.0–7.5 pH वाली मिट्टी में अच्छे बढ़ते हैं।
2. पानी की उपलब्धता
ड्रिप इरिगेशन सिस्टम लगाना सबसे बेहतर रहता है क्योंकि:
पानी की बचत होती है
पौधों को सही मात्रा में पानी मिलता है
उत्पादन बढ़ता है
3. बाजार की मांग समझें
ऐसे फलदार पौधे चुनें जिनकी स्थानीय बाजार में लगातार मांग हो।
4. मिश्रित खेती अपनाएं
सिर्फ एक प्रकार के पौधे लगाने की बजाय मिश्रित खेती करें ताकि:
साल भर आय बनी रहे
जोखिम कम हो
जमीन का बेहतर उपयोग हो
1 बीघा जमीन में सबसे ज्यादा मुनाफा देने वाले फलदार पौधे
अब जानते हैं उन पौधों के बारे में जो कम जमीन में अधिक मुनाफा दे सकते हैं।
1. अमरूद की खेती (Guava Farming)
अमरूद सबसे ज्यादा मुनाफा देने वाले फलदार पौधों में से एक है।
अमरूद क्यों लगाएं?
जल्दी फल देता है
पूरे साल मांग रहती है
कम देखरेख में अच्छा उत्पादन
प्रोसेसिंग इंडस्ट्री में भी उपयोग
कौन सी किस्म सबसे अच्छी है?
इलाहाबादी सफेदा
लाल गूदा अमरूद
लखनऊ-49
Taiwan Pink Guava
1 बीघा में कितने पौधे लग सकते हैं?
लगभग 80–120 पौधे।
कमाई कितनी हो सकती है?
अच्छी देखरेख से:
₹2 लाख से ₹5 लाख सालाना तक
प्रोफेशनल टिप्स
ड्रिप सिंचाई करें
समय-समय पर प्रूनिंग करें
जैविक खाद उपयोग करें
2. नींबू की खेती (Lemon Farming)
नींबू की मांग पूरे साल रहती है।
फायदे
बारह महीने बाजार
लंबे समय तक उत्पादन
कम लागत में खेती
बेस्ट वैरायटी
कागजी नींबू
Thai Lemon
Seedless Lemon
उत्पादन
एक पौधा साल में 1000+ नींबू दे सकता है।
1 बीघा से कमाई
₹1.5 लाख से ₹4 लाख तक संभव।
ज्यादा उत्पादन के टिप्स
पोटाश का उपयोग करें
फूल आने पर नियमित सिंचाई करें
नीम ऑयल स्प्रे करें
3. ड्रैगन फ्रूट की खेती (Dragon Fruit Farming)
ड्रैगन फ्रूट खेती आज के समय की सबसे तेजी से बढ़ती हुई हाई-प्रॉफिट खेती है।
ड्रैगन फ्रूट क्यों फायदेमंद है?
बाजार में ऊंची कीमत
कम पानी में खेती
रोग कम लगते हैं
लंबे समय तक उत्पादन
1 बीघा में पौधों की संख्या
400–500 पौधे तक।
बाजार भाव
₹80–₹300 प्रति किलो तक।
संभावित कमाई
₹4 लाख से ₹10 लाख सालाना तक।
प्रोफेशनल टिप्स
सीमेंट पोल सिस्टम लगाएं
ड्रिप इरिगेशन करें
जैविक खाद उपयोग करें
4. पपीता की खेती (Papaya Farming)
पपीता जल्दी कमाई देने वाली खेती है।
विशेषताएं
8–10 महीने में फल
कम लागत
हाई डिमांड
बेस्ट वैरायटी
Red Lady 786
Taiwan Papaya
1 बीघा से कमाई
₹2 लाख तक संभव।
अधिक उत्पादन के उपाय
संतुलित खाद दें
जलभराव न होने दें
नर पौधों को हटाएं
5. अनार की खेती (Pomegranate Farming)
अनार की खेती लंबे समय तक स्थिर आय देती है।
फायदे
हाई मार्केट वैल्यू
एक्सपोर्ट डिमांड
कम पानी की जरूरत
लोकप्रिय किस्में
भगवा
गणेश
संभावित आय
₹3 लाख से ₹7 लाख तक।
महत्वपूर्ण टिप्स
नियमित प्रूनिंग करें
फंगल रोग से बचाव करें
अच्छी धूप जरूरी
6. आम की हाई डेंसिटी खेती (High Density Mango Farming)
नई तकनीक से आम की खेती अब कम जगह में भी संभव है।
फायदे
कम जगह में ज्यादा पौधे
जल्दी फल
उच्च उत्पादन
बेस्ट वैरायटी
अमरपाली
मल्लिका
दशहरी
1 बीघा से आय
₹2 लाख से ₹6 लाख तक।
7. केला की खेती (Banana Farming)
केला हमेशा मांग में रहने वाली फसल है।
फायदे
तेजी से बढ़ती है
कम समय में उत्पादन
हर मौसम में मांग
बेस्ट किस्म
G9 Banana
कमाई
₹1.5 लाख से ₹3 लाख तक।
8. सीताफल की खेती (Custard Apple Farming)
कम पानी वाले क्षेत्रों के लिए बेहतरीन विकल्प।
फायदे
कम रखरखाव
अच्छी बाजार कीमत
सूखा सहनशील
आय
₹1 लाख से ₹3 लाख तक।
9. आंवला की खेती (Amla Farming)
आंवला औषधीय गुणों के कारण बहुत लोकप्रिय है।
फायदे
आयुर्वेदिक उपयोग
लंबे समय तक उत्पादन
कम देखभाल
प्रोसेसिंग से अतिरिक्त कमाई
कैंडी
जूस
पाउडर
10. कटहल की खेती (Jackfruit Farming)
कटहल का बाजार तेजी से बढ़ रहा है।
फायदे
कम लागत
हाई डिमांड
प्रोसेसिंग इंडस्ट्री में उपयोग
साल भर कमाई के लिए मिश्रित खेती मॉडल
यदि आप चाहते हैं कि हर महीने आय आती रहे, तो मिश्रित खेती सबसे बेहतर है।
उदाहरण मॉडल
मुख्य फलदार पौधे
अमरूद
नींबू
ड्रैगन फ्रूट
बीच में लगाएं
पपीता
केला
किनारों पर
करी पत्ता
सहजन
एलोवेरा
इंटरक्रॉपिंग से अतिरिक्त कमाई
फलदार पौधों के बीच खाली जगह में:
धनिया
पालक
मिर्च
हल्दी
अदरक
उगाकर अतिरिक्त आय प्राप्त कर सकते हैं।
ड्रिप इरिगेशन क्यों जरूरी है?
फायदे
50% तक पानी की बचत
ज्यादा उत्पादन
कम खरपतवार
खाद की बचत
जैविक खेती से अधिक लाभ
आजकल ऑर्गेनिक फलों की मांग तेजी से बढ़ रही है।
जैविक खाद
गोबर खाद
वर्मी कम्पोस्ट
नीम खली
बोनमील
फलदार पौधों में खाद कब दें?
महत्वपूर्ण समय
नई ग्रोथ के समय
फूल आने से पहले
फल बनने के समय
अधिक फल पाने की प्रोफेशनल तकनीक
1. मल्चिंग
मिट्टी में नमी बनाए रखती है।
2. प्रूनिंग
नई शाखाएं और ज्यादा फल लाने में मदद।
3. माइक्रो न्यूट्रिएंट स्प्रे
जिंक, बोरॉन, कैल्शियम जरूरी।
4. मधुमक्खी पालन
परागण बढ़ाकर उत्पादन बढ़ाता है।
फलदार पौधों को रोगों से कैसे बचाएं?
प्राकृतिक उपाय
नीम ऑयल स्प्रे
ट्राइकोडर्मा
छाछ स्प्रे
मार्केटिंग कैसे करें?
बेचने के तरीके
मंडी
लोकल मार्केट
होटल
ऑनलाइन बिक्री
WhatsApp ऑर्डर
Nursery & Plant Selling
प्रोसेसिंग से ज्यादा कमाई
फल बेचने के अलावा:
जूस
जैम
अचार
ड्राई फ्रूट
पल्प
से भी अच्छी कमाई हो सकती है।
1 बीघा जमीन के लिए सबसे लाभदायक मॉडल
मॉडल 1 – हाई प्रॉफिट
ड्रैगन फ्रूट + पपीता + सब्जियां
मॉडल 2 – कम रिस्क
अमरूद + नींबू + केला
मॉडल 3 – ऑर्गेनिक मॉडल
आंवला + सहजन + एलोवेरा
खेती शुरू करने से पहले बजट योजना
संभावित खर्च
पौधे
सिंचाई
खाद
मजदूरी
बांस/सपोर्ट
सरकार की योजनाएं और सब्सिडी
कई राज्यों में:
ड्रिप इरिगेशन सब्सिडी
फलदार पौधों पर सहायता
पॉलीहाउस सब्सिडी
उपलब्ध होती है।
नए किसान कौन सी गलतियां करते हैं?
गलत पौधे चुनना
ज्यादा पानी देना
मिट्टी जांच न कराना
बाजार रिसर्च न करना
खराब गुणवत्ता वाले पौधे खरीदना
गुणवत्ता वाले पौधे क्यों जरूरी हैं?
अच्छी नर्सरी से पौधे लेने के फायदे:
रोग मुक्त पौधे
तेजी से वृद्धि
जल्दी फल
ज्यादा उत्पादन
निष्कर्ष
यदि सही योजना और सही पौधों का चयन किया जाए तो केवल 1 बीघा जमीन से भी शानदार कमाई की जा सकती है। आज के समय में फलदार पौधों की खेती पारंपरिक खेती की तुलना में कई गुना अधिक लाभदायक साबित हो रही है।
सबसे महत्वपूर्ण बातें:
बाजार की मांग समझें
मिश्रित खेती अपनाएं
ड्रिप इरिगेशन उपयोग करें
जैविक खेती पर ध्यान दें
गुणवत्ता वाले पौधे लगाएं
यदि आप उच्च गुणवत्ता वाले फलदार पौधे, ड्रैगन फ्रूट पौधे, अमरूद, नींबू, आम, पपीता, सजावटी पौधे या गार्डनिंग सलाह चाहते हैं तो संपर्क करें:
Bonsai Plants Nursery
🌿 Fast Growing Quality Plants 🌿 Fruit Plants | Terrace Garden Plants | Exotic Plants 🌿 Wholesale & Retail Available
Turn Your Terrace Into a Green and Healthy Paradise
In today’s world, terrace gardening and kitchen gardening are not just hobbies anymore — they are becoming an essential part of a healthy lifestyle. Due to increasing pollution, chemical-filled vegetables, and limited space in cities, many people are now growing fresh vegetables, herbs, and fruits on their rooftops, balconies, and small home gardens.
With the right plant selection and proper care, you can enjoy fresh, organic, chemical-free produce throughout the year right from your home.
In this detailed guide, you will learn about:
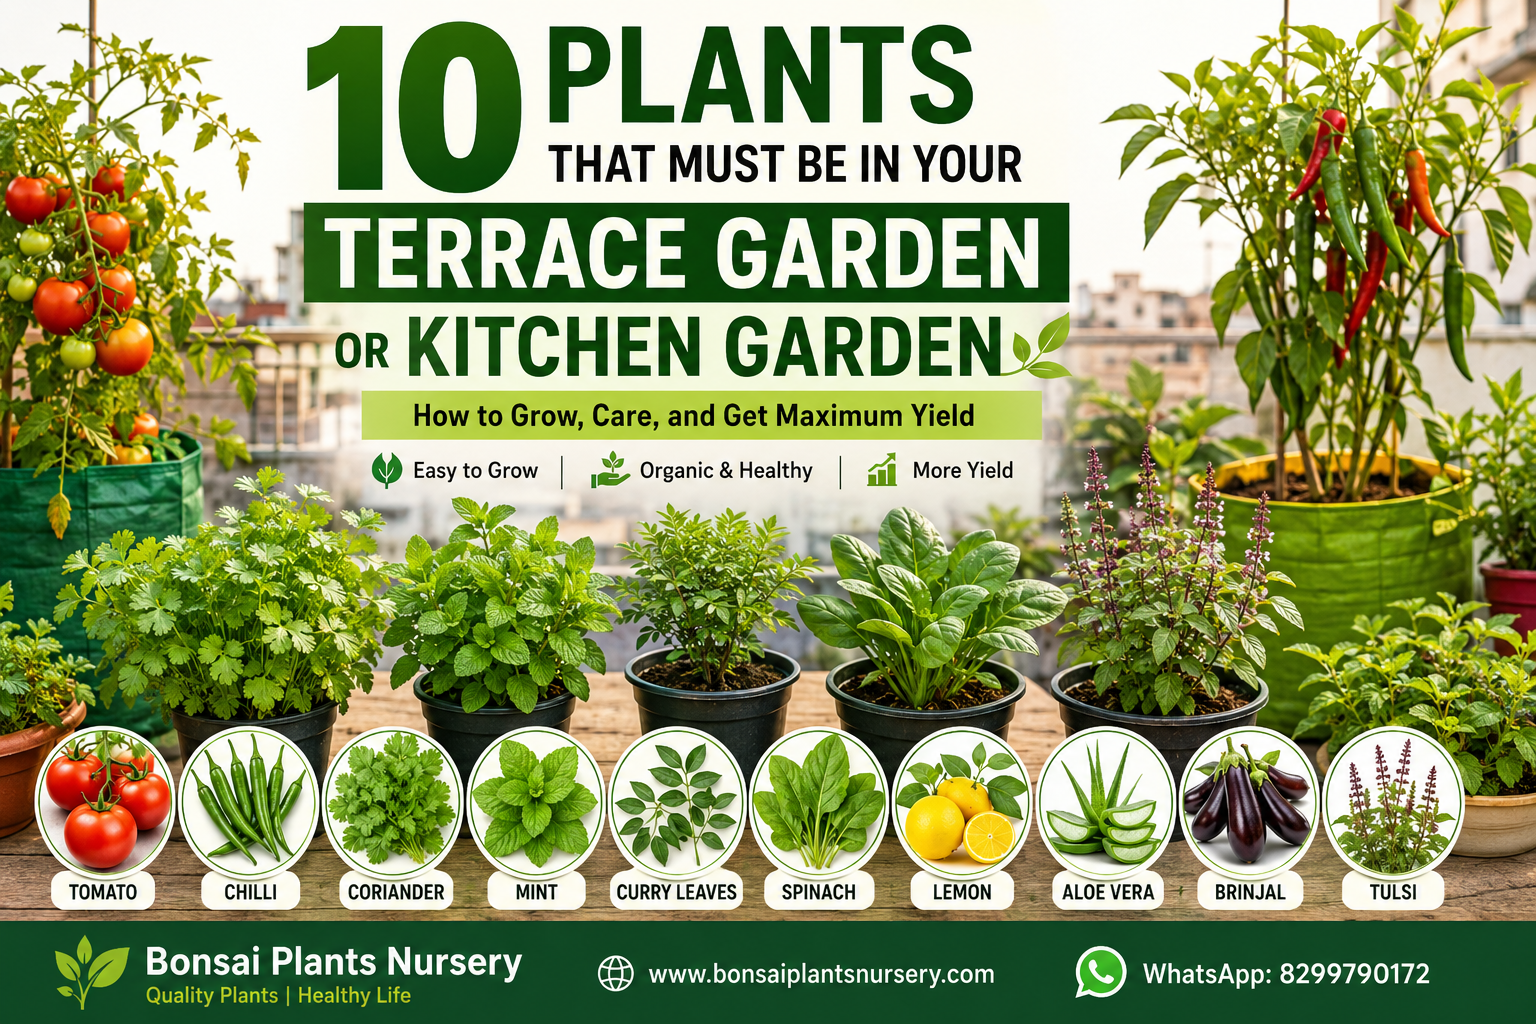
The 10 best plants every terrace garden should have
Terrace gardens and kitchen gardens offer many benefits:
Fresh and organic vegetables at home
Better health and nutrition
Reduced grocery expenses
Cleaner air around your home
Stress relief and mental peace
Better use of unused rooftop space
Even a small terrace or balcony can produce a surprising amount of vegetables and herbs if managed properly.
1. Tomato Plant – The King of Kitchen Gardens
Tomatoes are one of the most commonly used vegetables in every kitchen. They grow very well in pots, grow bags, and containers.
How to Grow Tomato Plants
Container Size
Use a 12–15 inch pot or grow bag.
Best Soil Mix
Prepare soil using:
50% garden soil
30% organic compost or cow dung manure
20% sand or cocopeat
Planting Method
Sow seeds 1 inch deep
Keep soil moist
Germination starts within 5–10 days
Transplant seedlings when they become 4–5 inches tall
Sunlight Requirement
Tomatoes need at least 5–6 hours of direct sunlight daily.
Tomato Plant Care Tips
Water only when the top soil feels dry
Avoid overwatering
Use support sticks for better growth
Remove yellow leaves regularly
Best Fertilizers
Vermicompost
Banana peel fertilizer
Mustard cake liquid fertilizer
Professional Tips for Higher Tomato Yield
1. Use Epsom Salt Spray
Magnesium improves flowering and fruit production.
2. Pruning is Important
Remove unnecessary side shoots.
3. Add Bone Meal
Bone meal increases flowering and fruit size.
4. Mulching
Cover the soil with dry leaves or straw to maintain moisture.
2. Chilli Plant – Easy and Highly Productive
Green chilli plants are perfect for terrace gardening because they require less space and produce continuously.
Planting Method
Use 10–12 inch containers
Well-drained soil is essential
Place in sunny location
Care Instructions
Avoid excessive watering
Feed organic fertilizer every 20 days
Prune dry branches regularly
Professional Tips for More Chillies
Pinching Method
Cut the top growing tip when the plant is young. This encourages branching and more chillies.
Organic Fertilizers
Use:
Vermicompost
Mustard cake
Compost tea
Sunlight
Minimum 6 hours of sunlight is necessary.
3. Coriander – Essential Kitchen Herb
Coriander is one of the easiest herbs to grow at home.
How to Grow Coriander
Seed Preparation
Lightly crush coriander seeds before sowing.
Soil
Use loose and fertile soil.
Container
Wide trays or shallow containers work best.
Coriander Care
Keep soil slightly moist
Avoid strong afternoon sunlight
Harvest within 25–30 days
Professional Tips
Succession Planting
Sow new seeds every 15 days for continuous harvest.
Liquid Fertilizer
Use organic liquid compost once every 2 weeks.
4. Mint Plant – Fast Growing and Refreshing
Mint grows rapidly and is ideal for beginners.
How to Grow Mint
Mint grows best from cuttings.
Steps
Take healthy stem cuttings
Plant in moist soil
Keep in partial sunlight
Mint Plant Care
Water regularly
Keep soil moist
Trim frequently for bushy growth
Professional Growing Tips
Frequent Harvesting
Regular trimming increases production.
Best Growing Condition
Mint prefers partial shade in hot summers.
5. Lemon Plant – Long-Term Fruit Producer
A healthy lemon plant can produce fruits for many years.
Planting Method
Container
Use a large 18–24 inch pot or drum.
Soil Mix
Garden soil
Organic compost
Sand
Sunlight
Full sunlight is essential.
Lemon Plant Care
Water 2–3 times weekly
Add compost every month
Prune weak branches
Professional Tips for More Lemons
Use Potash Fertilizer
Potash improves fruiting.
Neem Oil Spray
Protects against pests naturally.
Flower Drop Prevention
Maintain consistent watering during flowering.
6. Curry Leaf Plant – Aromatic and Useful
Curry leaves are widely used in Indian cooking and easy to maintain.
Planting Method
Use medium-sized pots
Place in sunny location
Use organic-rich soil
Care Tips
Avoid waterlogging
Feed organic manure monthly
Trim regularly for bushy growth
Professional Tips
Buttermilk Solution
Diluted buttermilk helps improve leaf growth.
Pruning
Frequent pruning encourages fresh leaves.
7. Spinach – Fast Growing Leafy Vegetable
Spinach is highly nutritious and grows quickly.
How to Grow Spinach
Use wide trays
Sow seeds directly
Keep soil moist
Spinach Care
Provide 4–5 hours sunlight
Avoid excessive water
Remove weeds regularly
Professional Tips for Higher Harvest
Cut and Come Again Method
Harvest outer leaves only so the plant keeps growing.
Organic Nutrition
Use vermicompost regularly.
8. Aloe Vera – Medicinal Wonder Plant
Aloe vera is one of the best medicinal plants for homes.
Planting Method
Use sandy soil
Plant suckers or small offsets
Ensure proper drainage
Aloe Vera Care
Water only when soil dries
Avoid excessive moisture
Keep in sunlight
Professional Tips
Minimal Watering
Overwatering is the biggest mistake with aloe vera.
Winter Care
Reduce watering during winter season.
9. Brinjal (Eggplant) – Heavy Yielding Vegetable
Brinjal plants can produce continuously for months.
Planting Method
Use 15-inch containers
Rich organic soil is best
Full sunlight required
Plant Care
Water regularly
Provide support if needed
Watch for pests
Professional Tips for More Brinjals
Mustard Cake Fertilizer
Improves flowering and fruiting.
Neem Spray
Controls insects naturally.
10. Tulsi (Holy Basil) – Sacred and Medicinal Plant
Tulsi is one of the most beneficial plants for every home.
How to Grow Tulsi
Grow from seeds or cuttings
Requires sunlight
Grows well in small pots
Tulsi Plant Care
Water lightly every day
Remove flowers regularly
Loosen soil occasionally
Professional Tips
Regular Pruning
Helps produce more leaves.
Avoid Waterlogging
Too much water damages roots.
Best Soil Mix for Terrace Gardening
Healthy soil is the foundation of successful gardening.
Ideal Soil Formula
50% garden soil
30% organic compost
20% sand or cocopeat
Importance of Organic Fertilizers
Organic gardening keeps vegetables chemical-free and healthy.
Best Organic Fertilizers
Cow dung manure
Vermicompost
Mustard cake
Neem cake
Bone meal
Correct Watering Techniques
Improper watering is one of the biggest reasons plants fail.
Important Rules
Water early morning or evening
Never overwater
Check soil before watering
Natural Pest Control Methods
Avoid harmful chemical pesticides.
Natural Solutions
Neem Oil Spray
Best natural pesticide.
Garlic-Chilli Spray
Works against sucking insects.
Buttermilk Spray
Helps prevent fungal diseases.
Importance of Sunlight
Most vegetables need 5–6 hours of sunlight daily.
Lack of Sunlight Causes
Weak plants
Low fruit production
Increased diseases
Professional Terrace Gardening Tips
1. Mulching
Helps maintain moisture and reduces heat.
2. Regular Pruning
Encourages fresh growth.
3. Seasonal Planting
Always grow plants according to season.
4. Companion Planting
Example:
Tomato + Basil
Chilli + Coriander
This reduces pests naturally.
How to Grow More in Small Spaces
Even small terraces can become productive gardens.
Smart Space Saving Ideas
Vertical Gardening
Use wall planters and vertical stands.
Hanging Pots
Perfect for herbs and flowers.
Multi-Level Stands
Increase growing area efficiently.
Common Mistakes Beginners Make
Overwatering
Poor soil quality
Lack of sunlight
Using very small pots
Ignoring pests
Avoiding these mistakes can dramatically improve plant health.
Benefits of Having a Kitchen Garden
Fresh Organic Food
You know exactly what you are eating.
Healthier Lifestyle
Gardening reduces stress and improves mental health.
Saves Money
Reduces vegetable expenses.
Better Environment
Plants improve air quality and reduce heat.
Final Thoughts
A beautiful terrace garden or kitchen garden can completely transform your lifestyle. With the right care, even a small rooftop can produce fresh vegetables, herbs, and fruits throughout the year.
The 10 plants mentioned above are easy to grow, highly useful, and perfect for beginners as well as experienced gardeners.
Success in gardening depends on:
Good soil
Proper sunlight
Balanced watering
Organic fertilizers
Regular care
If you are looking for quality plants, fruit plants, terrace garden plants, bonsai plants, or professional gardening guidance, contact:
Bonsai Plants Nursery
🌿 Fast Growing Quality Plants 🌿 Terrace Garden & Kitchen Garden Plants 🌿 Wholesale & Retail Available
आज के समय में टेरेस गार्डन और किचन गार्डन केवल शौक नहीं बल्कि स्वस्थ जीवनशैली का हिस्सा बन चुके हैं। शहरों में बढ़ते प्रदूषण, मिलावटी सब्जियों और सीमित जगह के कारण लोग अपने घर की छत, बालकनी या आंगन में पौधे उगाना पसंद कर रहे हैं। यदि सही पौधों का चुनाव और उनकी सही देखरेख की जाए तो आप पूरे साल ताजी सब्जियां, फल और हर्ब्स अपने घर पर ही उगा सकते हैं।
यदि आप भी अपने घर में एक सफल किचन गार्डन बनाना चाहते हैं, तो यह लेख आपके लिए बेहद उपयोगी है। इसमें हम बताएंगे ऐसे 10 जरूरी पौधों के बारे में जो हर टेरेस गार्डन में होने चाहिए। साथ ही जानेंगे:
टमाटर लगभग हर किचन में उपयोग होने वाली सबसे जरूरी सब्जी है। इसे गमले, ग्रो बैग या ड्रम में आसानी से उगाया जा सकता है।
टमाटर लगाने की विधि
12 से 15 इंच का गमला लें
मिट्टी में 50% गार्डन सॉयल, 30% गोबर खाद और 20% रेत मिलाएं
बीज या पौधा 1 इंच गहराई में लगाएं
रोज 5 से 6 घंटे धूप जरूरी है
देखरेख कैसे करें
मिट्टी सूखने पर ही पानी दें
पौधे को सहारा देने के लिए स्टिक लगाएं
हर 15 दिन में जैविक खाद दें
अधिक फल पाने की प्रोफेशनल टिप्स
केले के छिलके की खाद दें
फूल आने पर एप्सम साल्ट का हल्का स्प्रे करें
पुराने पीले पत्ते हटाते रहें
आम समस्याएं
पत्तियां पीली होना
फल में कीड़े लगना
फंगल इंफेक्शन
नीम ऑयल स्प्रे से अधिकांश समस्याओं का समाधान हो जाता है।
2. मिर्च का पौधा (Chilli Plant)
हरी मिर्च का पौधा बहुत कम जगह में अच्छी पैदावार देता है।
लगाने की विधि
10–12 इंच का गमला पर्याप्त है
अच्छी ड्रेनेज वाली मिट्टी उपयोग करें
पौधे को धूप वाली जगह रखें
देखरेख
ज्यादा पानी न दें
हर 20 दिन में वर्मी कम्पोस्ट डालें
समय-समय पर सूखी शाखाएं काटें
ज्यादा मिर्च पाने के उपाय
फूल आने पर सरसों खली का घोल दें
पौधे की टॉप कटिंग करें
नियमित धूप बहुत जरूरी है
3. धनिया (Coriander)
धनिया हर भारतीय रसोई की जरूरत है और इसे उगाना बहुत आसान है।
लगाने का तरीका
बीज को हल्का कुचलकर बोएं
चौड़े ट्रे या गमले का उपयोग करें
हल्की मिट्टी सबसे बेहतर रहती है
देखरेख
मिट्टी हमेशा हल्की नम रखें
तेज धूप से बचाएं
25–30 दिन में कटाई शुरू हो जाती है
प्रोफेशनल टिप्स
हर 15 दिन में नए बीज बोएं
जैविक तरल खाद उपयोग करें
सुबह के समय पानी दें
4. पुदीना (Mint Plant)
पुदीना तेजी से बढ़ने वाला पौधा है और गर्मियों में बहुत उपयोगी होता है।
लगाने की विधि
कटिंग से आसानी से उगाया जा सकता है
चौड़े गमले का उपयोग करें
मिट्टी में नमी बनाए रखें
देखभाल
नियमित पानी दें
आधी धूप और आधी छांव बेहतर है
सूखी पत्तियां हटाते रहें
ज्यादा उत्पादन के टिप्स
समय-समय पर कटाई करें
जैविक खाद देते रहें
पौधे को फैलने की जगह दें
5. नींबू का पौधा (Lemon Plant)
एक अच्छा नींबू का पौधा वर्षों तक फल देता है।
लगाने की विधि
बड़े ड्रम या 18 इंच गमले का उपयोग करें
अच्छी जल निकासी जरूरी है
पौधे को सीधी धूप में रखें
देखरेख
सप्ताह में 2–3 बार पानी दें
हर महीने गोबर खाद डालें
समय-समय पर प्रूनिंग करें
अधिक फल पाने के उपाय
बोनमील और पोटाश का उपयोग करें
फूल गिरने से बचाने के लिए नियमित सिंचाई करें
नीम ऑयल स्प्रे करें
6. करी पत्ता (Curry Leaf Plant)
करी पत्ता भारतीय भोजन का महत्वपूर्ण हिस्सा है।
लगाने की विधि
मध्यम आकार के गमले में लगाएं
धूप वाली जगह रखें
अच्छी जैविक मिट्टी उपयोग करें
देखरेख
ज्यादा पानी से बचें
सूखी टहनियां काटें
महीने में एक बार खाद दें
प्रोफेशनल टिप्स
छाछ का हल्का घोल डालें
पौधे को समय-समय पर ट्रिम करें
गर्मियों में मल्चिंग करें
7. पालक (Spinach)
पालक तेजी से बढ़ती है और पोषण से भरपूर होती है।
लगाने का तरीका
चौड़े ट्रे में बीज बोएं
मिट्टी को हल्का नम रखें
4–5 घंटे धूप जरूरी है
देखरेख
ज्यादा पानी न भरने दें
समय-समय पर खरपतवार हटाएं
जैविक खाद उपयोग करें
अधिक उत्पादन की टिप्स
हर 20 दिन में नई बुवाई करें
कट एंड कम अगेन तकनीक अपनाएं
वर्मी कम्पोस्ट डालें
8. एलोवेरा (Aloe Vera)
एलोवेरा औषधीय गुणों से भरपूर पौधा है।
लगाने की विधि
रेतीली मिट्टी उपयोग करें
छोटे पौधों से आसानी से उगता है
कम पानी की जरूरत होती है
देखभाल
ज्यादा पानी से जड़ सड़ सकती है
तेज धूप पसंद करता है
महीने में एक बार खाद पर्याप्त है
प्रोफेशनल टिप्स
मिट्टी पूरी सूखने पर ही पानी दें
पुरानी पत्तियां हटाते रहें
सर्दियों में पानी कम करें
9. बैंगन (Brinjal Plant)
बैंगन का पौधा लंबे समय तक फल देता है।
लगाने की विधि
15 इंच गमला उपयोग करें
जैविक खाद वाली मिट्टी लें
पर्याप्त धूप जरूरी है
देखरेख
नियमित पानी दें
पौधे को सपोर्ट दें
कीट नियंत्रण जरूरी है
अधिक फल के टिप्स
सरसों खली खाद उपयोग करें
समय-समय पर प्रूनिंग करें
नीम ऑयल स्प्रे करें
10. तुलसी (Tulsi Plant)
तुलसी धार्मिक और औषधीय दोनों दृष्टि से महत्वपूर्ण है।
लगाने की विधि
छोटे गमले में आसानी से उगती है
धूप जरूरी है
बीज या कटिंग दोनों से उग सकती है
देखभाल
रोज हल्का पानी दें
फूल आने पर कटिंग करें
समय-समय पर मिट्टी ढीली करें
अधिक बढ़वार के टिप्स
सूखी पत्तियां हटाएं
गोबर खाद डालें
बारिश में जलभराव न होने दें
टेरेस गार्डन के लिए सही मिट्टी कैसे तैयार करें
अच्छी मिट्टी सफल गार्डनिंग की सबसे बड़ी कुंजी है।
आदर्श मिट्टी मिश्रण
50% गार्डन सॉयल
30% गोबर खाद या वर्मी कम्पोस्ट
20% रेत या कोकोपीट
मिट्टी की विशेषताएं
हल्की हो
पानी निकासी अच्छी हो
जैविक पदार्थों से भरपूर हो
जैविक खाद का महत्व
रासायनिक खाद पौधों को नुकसान पहुंचा सकती है। इसलिए जैविक खाद का उपयोग बेहतर होता है।
सबसे अच्छी जैविक खाद
गोबर खाद
वर्मी कम्पोस्ट
सरसों खली
बोनमील
नीम खली
घर पर बनने वाली खाद
किचन वेस्ट कम्पोस्ट
केले के छिलके की खाद
चाय पत्ती खाद
पौधों में पानी देने का सही तरीका
गलत तरीके से पानी देना पौधों की सबसे बड़ी समस्या है।
ध्यान रखने योग्य बातें
सुबह या शाम को पानी दें
दोपहर में पानी न दें
मिट्टी जांचकर ही पानी दें
ज्यादा पानी के नुकसान
जड़ सड़ना
फंगल रोग
पौधे की वृद्धि रुकना
पौधों को कीट और रोगों से कैसे बचाएं
प्राकृतिक उपाय
नीम ऑयल स्प्रे
लहसुन और मिर्च स्प्रे
छाछ का घोल
नियमित निरीक्षण जरूरी
पत्तियों को चेक करें
संक्रमित भाग तुरंत हटाएं
साफ-सफाई बनाए रखें
टेरेस गार्डन में धूप का महत्व
अधिकांश सब्जियों को 5–6 घंटे धूप चाहिए।
धूप कम होने पर समस्याएं
फल कम लगना
पौधे कमजोर होना
रोग बढ़ना
प्रोफेशनल गार्डनिंग टिप्स
1. मल्चिंग करें
सूखी पत्तियां या घास मिट्टी पर बिछाने से नमी बनी रहती है।
2. नियमित प्रूनिंग करें
पुरानी शाखाएं हटाने से नई ग्रोथ बढ़ती है।
3. सीजन के अनुसार पौधे लगाएं
गलत मौसम में पौधे कमजोर हो जाते हैं।
4. साथी पौधों का उपयोग करें
जैसे टमाटर के साथ तुलसी लगाने से कीट कम लगते हैं।
छोटे स्थान में ज्यादा उत्पादन कैसे लें
यदि आपके पास कम जगह है तो:
वर्टिकल गार्डन बनाएं
हैंगिंग पॉट्स उपयोग करें
रेलिंग प्लांटर लगाएं
मल्टी लेयर स्टैंड उपयोग करें
टेरेस गार्डन के फायदे
1. ताजी और ऑर्गेनिक सब्जियां
2. मानसिक शांति
3. घर का तापमान कम होना
4. प्रदूषण कम करना
5. पैसे की बचत
शुरुआती लोग कौन सी गलतियां करते हैं
बहुत ज्यादा पानी देना
छोटे गमले में बड़े पौधे लगाना
खराब मिट्टी उपयोग करना
धूप की अनदेखी करना
समय पर खाद न देना
निष्कर्ष
यदि सही तरीके से पौधों की देखरेख की जाए तो आपका टेरेस गार्डन पूरे परिवार के लिए ताजी और स्वस्थ सब्जियों का स्रोत बन सकता है। ऊपर बताए गए 10 पौधे लगभग हर भारतीय घर के लिए उपयोगी हैं और इन्हें उगाना भी आसान है।
सफल गार्डनिंग का राज है:
सही मिट्टी
उचित धूप
संतुलित पानी
जैविक खाद
नियमित देखभाल
यदि आप गुणवत्ता वाले पौधे, फलदार पौधे, टेरेस गार्डन पौधे या गार्डनिंग सलाह चाहते हैं तो संपर्क करें:
Bonsai Plants Nursery
🌿 Fast Growing Quality Plants 🌿 Terrace Garden & Kitchen Garden Plants 🌿 Wholesale & Retail Available
Star Fruit, also known as Kamrakh in India, is a unique and attractive tropical fruit that gets its name from its star-shaped slices. It is not only delicious but also highly decorative, making it a perfect addition to home gardens.
You can easily grow a star fruit plant in your garden, terrace, or even in a large pot. With proper care and techniques, the plant can produce fruits multiple times a year.
Growing star fruit at home is easy, rewarding, and profitable. With the right care techniques, you can enjoy multiple harvests every year and even turn it into a small business opportunity.
कमरख (Star Fruit), जिसे अंग्रेज़ी में स्टार फ्रूट कहा जाता है, एक बेहद आकर्षक और स्वादिष्ट फल है। इसका आकार सितारे (Star) जैसा होता है, इसलिए इसे स्टार फ्रूट कहा जाता है। यह पौधा न केवल फल देने के लिए बल्कि सजावटी (ornamental) पौधे के रूप में भी बहुत लोकप्रिय है।
आप इसे अपने घर के बगीचे, छत या बड़े गमले में आसानी से उगा सकते हैं। सही देखभाल और तकनीक अपनाकर आप साल में कई बार फल प्राप्त कर सकते हैं।
Papaya is one of the easiest and fastest-growing fruit plants you can grow at home. Whether you have a garden, terrace, or even a large pot, papaya can thrive with the right care. It starts fruiting quickly and can produce continuously for many months.
This detailed guide will help you learn how to grow papaya at home, how to care for it properly, and how to maximize fruit production for better yield and even business opportunities.
Growing papaya at home is easy and highly rewarding. With proper care and the right techniques, you can enjoy fresh, healthy fruits and even turn it into a profitable business.
FAQs
Q1. Can papaya be grown in pots?
Yes, dwarf varieties grow very well in containers.
पपीता (Papaya) एक ऐसा फलदार पौधा है जिसे आप बहुत आसानी से अपने घर, छत, बगीचे या यहां तक कि गमले में भी उगा सकते हैं। यह तेजी से बढ़ने वाला पौधा है और कम समय में फल देना शुरू कर देता है। यदि सही तकनीक अपनाई जाए तो आप साल भर भरपूर पपीते प्राप्त कर सकते हैं।
यह विस्तृत गाइड आपको बताएगी कि पपीता का पौधा घर पर कैसे लगाएं, उसकी देखभाल कैसे करें और अधिक से अधिक फल कैसे प्राप्त करें।
केला (Banana) भारत में सबसे अधिक उगाए जाने वाले फलों में से एक है। यह न केवल स्वादिष्ट होता है बल्कि पोषक तत्वों से भी भरपूर होता है। अच्छी बात यह है कि आप इसे अपने घर, छत, बगीचे या गमले में भी आसानी से उगा सकते हैं।
यदि सही तकनीक अपनाई जाए तो एक ही पौधे से भरपूर और बड़े आकार के केले प्राप्त किए जा सकते हैं। इस विस्तृत गाइड में हम आपको बताएंगे कि घर पर केला कैसे लगाएं, उसकी देखभाल कैसे करें और अधिक से अधिक फल कैसे प्राप्त करें।
केला उगाने के फायदे
साल भर उत्पादन देने वाला पौधा
कम जगह में भी उगाया जा सकता है
तेजी से बढ़ने वाला पौधा
पौष्टिक फल (पोटेशियम, विटामिन B6, फाइबर)
घर के लिए ऑर्गेनिक फल
केला लगाने का सही समय
भारत में केला लगाने का सबसे अच्छा समय:
फरवरी से अप्रैल (Spring Season)
जुलाई से अगस्त (Monsoon Season)
लेकिन यदि आप गमले में उगा रहे हैं तो पूरे साल लगा सकते हैं, बस अत्यधिक ठंड और पाला से बचाव करें।
केला उगाने के लिए सही किस्में
घर पर उगाने के लिए ये किस्में सबसे अच्छी मानी जाती हैं:
ग्रैंड नैन (Grand Naine)
ड्वार्फ कैवेंडिश (Dwarf Cavendish)
राजेली
मालभोग
इलायची केला
👉 गमले के लिए ड्वार्फ किस्में सबसे बेहतर होती हैं।
केला का पौधा कैसे लगाएं (Step-by-Step)
1. सही स्थान का चयन
6–8 घंटे धूप जरूरी
पानी की निकासी अच्छी हो
तेज हवा से बचाव
2. मिट्टी की तैयारी
बेहतरीन ग्रोथ के लिए मिट्टी मिश्रण:
40% बगीचे की मिट्टी
30% गोबर खाद
20% रेत
10% वर्मीकम्पोस्ट
3. गड्ढा या गमला तैयार करना
जमीन में: 2x2x2 फीट गड्ढा
गमला: कम से कम 18–24 इंच
4. पौधा लगाना
स्वस्थ sucker (चूसक) का चयन करें
पौधे को सीधा लगाएं
मिट्टी भरकर हल्का दबाएं
तुरंत पानी दें
पानी देने का सही तरीका
केला एक पानी पसंद करने वाला पौधा है:
गर्मियों में: रोजाना या 1 दिन छोड़कर
सर्दियों में: 3–4 दिन में
पानी जमा न होने दें
👉 ड्रिप इरिगेशन सबसे अच्छा विकल्प है।
खाद और उर्वरक (Fertilizer Guide)
अधिक फल पाने के लिए नियमित खाद जरूरी है:
ऑर्गेनिक खाद
गोबर खाद – हर महीने
वर्मीकम्पोस्ट – 15 दिन में
नीम खली – कीट नियंत्रण के लिए
लिक्विड खाद
सरसों खली घोल
केले के छिलके का घोल
छाछ (Buttermilk spray)
केला पौधे की देखभाल कैसे करें
1. मल्चिंग
सूखी पत्तियां या घास डालें
मिट्टी की नमी बनाए रखता है
2. सपोर्ट देना
फल लगने पर पौधा झुक सकता है
लकड़ी या बांस से सहारा दें
3. अनावश्यक पौधों को हटाना
एक पौधे के साथ 1–2 suckers ही रखें
अधिक फल पाने के 15 बेहतरीन उपाय
सही किस्म का चयन करें
भरपूर धूप दें
समय पर पानी दें
नियमित खाद डालें
पौधे के आसपास खरपतवार हटाएं
सूखे पत्ते काटें
मल्चिंग करें
पोटाश युक्त खाद दें
फूल आने पर विशेष ध्यान दें
समय-समय पर छंटाई करें
कीट नियंत्रण करें
पौधे को सहारा दें
जैविक स्प्रे का उपयोग करें
मिट्टी को ढीला रखें
मौसम के अनुसार देखभाल करें
सामान्य समस्याएं और समाधान
1. पत्तियां पीली होना
कारण: पानी की कमी या पोषक तत्व की कमी
समाधान: नियमित पानी और नाइट्रोजन खाद दें
2. फल छोटे रहना
कारण: पोषण की कमी
समाधान: पोटाश और जैविक खाद बढ़ाएं
3. कीट और रोग
एफिड्स
लीफ स्पॉट
समाधान:
नीम तेल स्प्रे
बेकिंग सोडा स्प्रे
गमले में केला कैसे उगाएं
बड़ा गमला चुनें (कम से कम 20 इंच)
ड्रेनेज होल जरूरी
हल्की और उपजाऊ मिट्टी
नियमित खाद और पानी
केला कब फल देता है?
8–12 महीनों में फल
फूल आने के 3–4 महीने बाद फल तैयार
कटाई और भंडारण
फल हल्के हरे होने पर काटें
छायादार स्थान में रखें
धीरे-धीरे पकेंगे
निष्कर्ष
केला उगाना बहुत आसान है यदि आप सही तकनीक अपनाते हैं। यह गाइड आपको घर पर सफलतापूर्वक केला उगाने और अधिक से अधिक फल पाने में मदद करेगी।
यदि आप उच्च गुणवत्ता वाले पौधे खरीदना चाहते हैं, तो अभी विजिट करें:
Banana is one of the most popular and widely grown fruits in India. It is not only delicious but also highly nutritious. The best part is that you can easily grow a banana plant at home—in your garden, terrace, or even in a large pot.
With the right techniques, a single plant can produce a heavy bunch of large, healthy bananas. In this detailed guide, you’ll learn how to grow banana plants at home, how to care for them properly, and how to maximize fruit production.
However, if you are growing in pots, you can plant anytime except during extreme cold or frost conditions.
Best Banana Varieties for Home Growing
Grand Naine
Dwarf Cavendish
Rajeli
Malbhog
Elaichi Banana
👉 Dwarf varieties are best for container gardening.
How to Plant a Banana Plant (Step-by-Step)
1. Selecting the Right Location
Requires 6–8 hours of direct sunlight
Good drainage is essential
Protect from strong winds
2. Soil Preparation
Ideal soil mix:
40% garden soil
30% cow dung compost
20% sand
10% vermicompost
3. Preparing Pit or Pot
In ground: 2x2x2 feet pit
Pot: Minimum 18–24 inches wide and deep
4. Planting Process
Choose a healthy sucker (plant shoot)
Plant it upright
Fill soil and press gently
Water immediately after planting
Watering Guide
Banana is a water-loving plant:
Summer: Daily or alternate day
Winter: Every 3–4 days
Avoid waterlogging
👉 Drip irrigation is ideal for best growth.
Fertilizer Guide for Maximum Yield
Organic Fertilizers
Cow dung compost – once a month
Vermicompost – every 15 days
Neem cake – for pest prevention
Liquid Fertilizers
Mustard cake solution
Banana peel fertilizer
Buttermilk spray
Banana Plant Care Tips
1. Mulching
Use dry leaves or grass
Helps retain soil moisture
2. Providing Support
Plant may bend during fruiting
Use bamboo or wooden support
3. Removing Extra Shoots
Keep only 1–2 suckers per plant
15 Proven Tips to Get Maximum Fruits
Choose high-yield variety
Ensure full sunlight
Maintain regular watering
Apply fertilizers on time
Remove weeds regularly
Prune dry leaves
Use mulching
Add potassium-rich fertilizers
Take special care during flowering stage
Do periodic pruning
Control pests
Provide plant support
Use organic sprays
Keep soil loose and aerated
Adjust care according to seasons
Common Problems and Solutions
1. Yellow Leaves
Cause: Lack of water or nutrients
Solution: Improve watering and add nitrogen fertilizer
2. Small Fruits
Cause: Nutrient deficiency
Solution: Increase potassium and organic feeding
3. Pests and Diseases
Common issues:
Aphids
Leaf spot
Solutions:
Neem oil spray
Baking soda spray
Growing Banana in Pots
Choose a large pot (minimum 20 inches)
Ensure drainage holes
Use fertile and light soil mix
Regular feeding and watering is essential
When Does Banana Plant Bear Fruit?
8–12 months after planting
Fruits develop 3–4 months after flowering
Harvesting and Storage
Harvest when fruits are light green
Keep in a shaded place
They will ripen naturally
Conclusion
Growing banana at home is easy if you follow the right methods. This guide will help you successfully grow healthy plants and achieve maximum fruit production.
If you want to grow more plants at a very low cost, propagation through cuttings is one of the easiest and most successful methods. With this technique, you can create multiple new plants from a single parent plant—quickly and efficiently.
Flowering_Plants_for_Propagation_from_Cuttings
In this detailed expert-level guide (5200+ words), you will learn:
The best flowering plants for propagation through cuttings
Step-by-step method for successful rooting
Advanced tips to speed up root development
Common mistakes and how to avoid them
🌱 What is Plant Cutting?
Plant cutting is a method of propagation where a piece of a plant (stem, leaf, or root) is cut and grown into a new plant.
👉 Benefits:
Fast results
Exact clone of the parent plant
Very low cost
🌸 10 Best Flowering Plants for Propagation from Cuttings
1. Rose (Rosa)
Most popular flowering plant
Grows easily from hardwood cuttings
2. Hibiscus
Large, colorful flowers
Roots quickly from softwood cuttings
3. Jasmine (Mogra)
Fragrant flowers
Best propagated in warm weather
4. Bougainvillea
Drought-tolerant
Grows well from semi-hardwood cuttings
5. Frangipani (Champa)
Thick stems root easily
6. Marigold
Some varieties can grow from cuttings
7. Petunia
Fast-growing from soft cuttings
8. Dahlia
Can be grown from both tubers and cuttings
9. Croton (Ornamental)
Decorative foliage plant
10. Coleus
One of the easiest plants to propagate
✂️ How to Take Perfect Cuttings
✔️ Key Points:
Choose a healthy parent plant
Cutting length: 4–6 inches
Must have 2–3 nodes
✔️ Cutting Method:
Use a sharp blade
Cut at a 45° angle
Remove lower leaves
🌿 Best Growing Medium
✔️ Ideal Mix:
50% Sand
50% Cocopeat
👉 Ensures excellent drainage and aeration
🌱 Step-by-Step Planting Method
Fill pot with growing medium
Insert cutting 1–2 inches deep
Press gently
Water lightly
Keep in shade
💧 Watering Tips
Keep soil slightly moist
Avoid overwatering
☀️ Light Requirements
Bright indirect sunlight
Avoid harsh direct sun initially
🌾 Rooting Boost Techniques
Use honey as natural rooting hormone
Apply aloe vera gel
Use commercial rooting powder
⏳ Rooting Time
Usually 10–25 days depending on plant type
🌿 When to Transplant?
When new leaves start appearing
🐛 Problems & Solutions
Problem: Cutting drying out
👉 Cause: Lack of moisture
Problem: Rotting cutting
👉 Cause: Overwatering
⚠️ Common Mistakes
Taking cuttings in wrong season
Too much sunlight
Poor drainage
📅 Best Time for Cuttings
February to April
July to September
❓ FAQ (15 Questions)
Q1: Can all plants grow from cuttings?
No, only specific varieties.
Q2: Easiest plant for beginners?
Coleus
Q3: How long for roots to develop?
10–25 days
Q4: Can cuttings grow in water?
Yes, some plants can
Growing plants from cuttings is simple, cost-effective, and rewarding. By following the right steps, you can create dozens of new plants at home and even turn it into a profitable business.
अगर आप कम खर्च में ज्यादा पौधे उगाना चाहते हैं, तो कटिंग (Cutting Propagation) सबसे आसान और सफल तरीका है। इस विधि में आप एक ही पौधे से कई नए पौधे तैयार कर सकते हैं—वो भी बहुत कम समय में। खास बात यह है कि कई खूबसूरत फूल वाले पौधे कटिंग से बहुत आसानी से उग जाते हैं।
Flowering_Plants_for_Propagation_from_Cuttings
इस 5200+ शब्दों की एक्सपर्ट गाइड में हम जानेंगे:
कटिंग से उगाने के लिए सबसे अच्छे फूल वाले पौधे
स्टेप-बाय-स्टेप सही तरीका
rooting तेजी से कराने की ट्रिक्स
common mistakes और solutions
🌱 कटिंग क्या होती है?
कटिंग का मतलब है किसी पौधे की टहनी (branch) का एक हिस्सा काटकर उसे नई मिट्टी में लगाकर नया पौधा बनाना।
👉 यह विधि सबसे ज्यादा उपयोगी है क्योंकि:
जल्दी रिजल्ट मिलता है
पौधा original जैसा ही होता है
लागत बहुत कम होती है
🌸 कटिंग से उगने वाले 10 सबसे अच्छे फूल वाले पौधे
1. गुलाब (Rose)
सबसे लोकप्रिय फूल
हार्डवुड कटिंग से आसानी से उगता है
2. गुड़हल (Hibiscus)
बड़े और रंग-बिरंगे फूल
softwood कटिंग से तेजी से rooting
3. मोगरा (Jasmine)
खुशबूदार फूल
गर्मियों में कटिंग best
4. बोगनविलिया (Bougainvillea)
कम पानी में भी उगता है
semi-hardwood cutting से उगाएं
5. चंपा (Frangipani)
मोटी शाखाओं से आसानी से उगता है
6. गेंदा (Marigold)
कुछ varieties cutting से भी उगती हैं
7. पेटुनिया (Petunia)
सॉफ्ट कटिंग से जल्दी तैयार
8. डहेलिया (Dahlia)
ट्यूबर के साथ-साथ कटिंग से भी
9. क्रोटन (Croton – ornamental)
decorative foliage plant
10. कोलियस (Coleus)
सबसे आसान और तेजी से rooting
✂️ कटिंग लेने का सही तरीका
✔️ जरूरी बातें:
healthy plant से cutting लें
4–6 इंच लंबी टहनी
2–3 nodes होनी चाहिए
✔️ कटिंग कैसे काटें:
sharp blade से 45° angle पर काटें
नीचे की पत्तियां हटा दें
🌿 मिट्टी और माध्यम (Growing Medium)
✔️ Best mix:
50% रेत
50% कोकोपीट
👉 इससे drainage और rooting दोनों अच्छे होते हैं
🌱 कटिंग लगाने की स्टेप-बाय-स्टेप विधि
गमले में मिट्टी भरें
कटिंग को 1–2 इंच गहराई तक लगाएं
हल्का दबाएं
पानी दें
छाया में रखें
💧 पानी और नमी
मिट्टी हमेशा हल्की नम रखें
ज्यादा पानी न दें
☀️ धूप और स्थान
indirect sunlight
direct धूप से बचाएं (initial stage)
🌾 rooting तेजी से कराने के तरीके
शहद (Honey) का उपयोग
एलोवेरा जेल
rooting hormone powder
⏳ कितने दिन में जड़ें बनती हैं?
10–25 दिन (plant पर depend करता है)
🌿 transplant कब करें?
जब नई पत्तियां आने लगें
🐛 समस्या और समाधान
समस्या: कटिंग सूख रही है
👉 कारण: पानी की कमी
समस्या: सड़ रही है
👉 कारण: ज्यादा पानी
⚠️ आम गलतियां
गलत मौसम में कटिंग लेना
ज्यादा धूप देना
📅 कटिंग के लिए सही समय
फरवरी–अप्रैल
जुलाई–सितंबर
❓ FAQ (15 सवाल)
Q1: क्या सभी पौधे कटिंग से उग सकते हैं?
नहीं, कुछ ही पौधे।
Lemon (Citrus limon) is an essential fruit in every Indian household—used in drinks, salads, pickles, and daily cooking. The good news is that you don’t need a large garden anymore. With the right techniques, you can grow lemon plants in pots (container gardening) and enjoy fruits throughout the year (baramasi/everbearing).
This ultimate expert-level guide (5200+ words) covers everything you need—from selecting the right variety to advanced methods for year-round fruiting and high yield in containers.
Growing lemons in pots is practical, productive, and profitable. With the right variety, soil, nutrition, and pruning strategy, you can achieve year-round harvests and even build a small business around container-grown citrus.
नींबू (Lemon) भारतीय रसोई का एक अनिवार्य हिस्सा है। चाहे चाय हो, सलाद हो या गर्मियों का शरबत – नींबू हर जगह उपयोगी है। अच्छी बात यह है कि अब आपको नींबू के लिए बाजार पर निर्भर रहने की जरूरत नहीं है, क्योंकि आप इसे अपने घर की छत, बालकनी या छोटे से गार्डन में गमले में उगाकर साल भर (बारहमासी) फल प्राप्त कर सकते हैं।
Lychee (Litchi chinensis) is one of the most delicious, juicy, and popular fruits in India. Traditionally, it is grown in large orchards, but with modern gardening techniques, you can now successfully grow it in a pot (container gardening) and even get a good amount of fruits at home.
This is a fully detailed expert-level guide (5200+ words) that covers everything from plant selection to advanced techniques for getting maximum fruit yield.
Growing lychee in a pot is not difficult if you follow the right techniques. With proper care, you can enjoy fresh, chemical-free lychee fruits at home and even turn it into a profitable business.