Best Plants to Grow During Summer for a Healthy and Beautiful Garden
May and June are among the hottest months in India, but they are also one of the most important seasons for planting many fruit plants, vegetables, flowering plants, herbs, and ornamental plants. If the right plants are selected and proper care is given, these months can help establish a strong and productive garden before the monsoon season begins.
Plants grown during May–June benefit greatly from the early rains of the monsoon, which helps roots establish quickly and promotes faster growth.
Many gardening enthusiasts and farmers often ask:
- Which plants should be planted in May and June?
- How should plants be cared for during summer?
- Which plants grow well in hot weather?
- Which fruit plants are best for this season?
- How can plants be protected from extreme heat?
In this detailed guide, you will learn:
- Best fruit plants for May–June plantation
- Vegetables suitable for summer gardening
- Flowering and ornamental plants for hot weather
- Proper watering techniques
- Fertilizer recommendations
- Organic plant care methods
- Professional gardening tips for better growth and yield

For high-quality plants and gardening guidance:
🌿 www.bonsaiplantsnursery.com
📱 WhatsApp: 8299790172
Why May–June is Important for Planting
Plants established during May and June become stronger before the rainy season arrives. Their roots spread rapidly, helping them survive and grow better throughout the year.
Benefits of Planting During May–June
- Faster root development
- Better monsoon growth
- Stronger plant establishment
- Higher survival rate
- Improved long-term productivity
Important Things to Remember Before Planting
1. Plant During Morning or Evening
Avoid planting during the afternoon because extreme heat can stress young plants.
2. Prepare Healthy Soil
Good soil is the foundation of successful gardening.
Ideal Soil Mix
- 50% garden soil
- 30% organic compost or cow dung manure
- 20% sand or cocopeat
This mixture improves drainage, moisture retention, and root growth.
3. Use Mulching
Mulching helps protect plants from summer heat.
Best Mulching Materials
- Dry leaves
- Straw
- Coconut husk
- Dry grass
4. Regular Watering is Essential
Summer plants need more attention because water evaporates quickly in high temperatures.
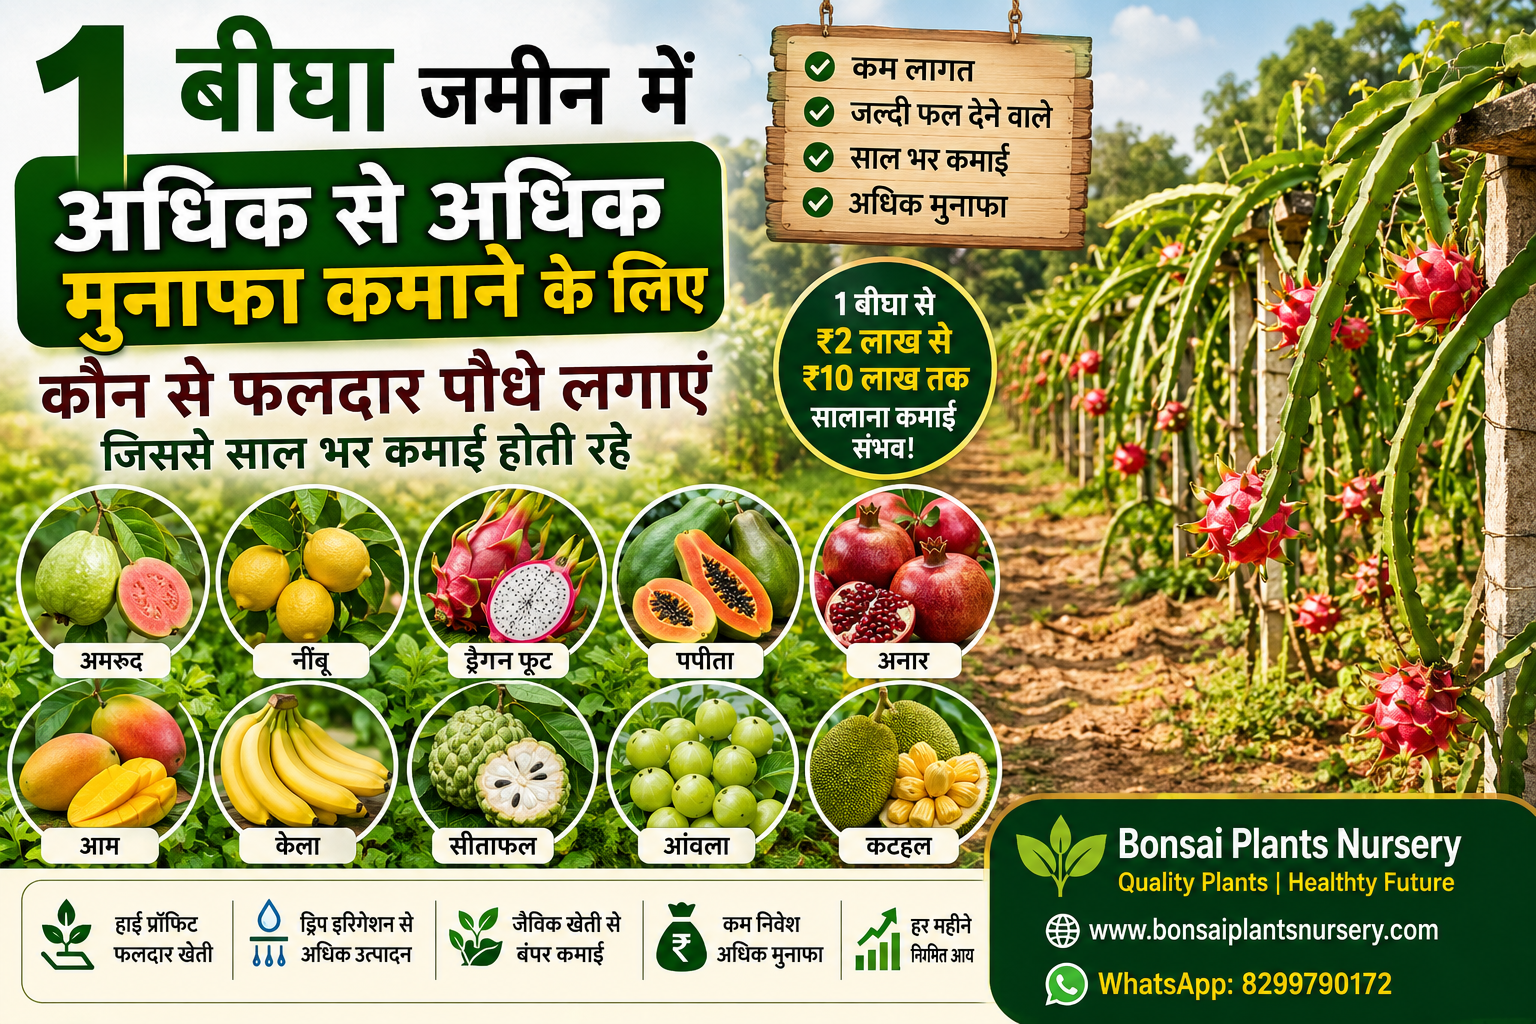
Best Fruit Plants to Grow in May–June
1. Mango Plant
Summer is one of the best seasons to plant mango trees.
Benefits of Mango Plantation
- Long lifespan
- High market demand
- Excellent long-term investment
- Low maintenance after establishment
How to Plant Mango Trees
Pit Preparation
- Dig a 3×3 feet pit
- Add organic compost and neem cake
Spacing
Maintain 10–15 feet distance between plants.
Mango Plant Care
Watering
Water 2–3 times weekly during the initial growth stage.
Fertilizers
- Cow dung manure
- Vermicompost
- Bone meal
Professional Tips
- Apply mulch around the plant
- Use shade nets for young plants
- Prune regularly for better branching
2. Guava Plant
Guava is one of the easiest and fastest fruit plants to grow.
Why Grow Guava?
- Fast fruiting
- Multiple harvests annually
- Suitable for small spaces
- High market demand
Planting Method
- Prepare a 2×2 feet pit
- Use organic-rich soil
- Choose a sunny location
Guava Plant Care
- Water regularly
- Add compost monthly
- Remove dry branches
Tips for More Fruits
- Regular pruning
- Potash fertilizer during flowering
- Neem oil spray for pest control
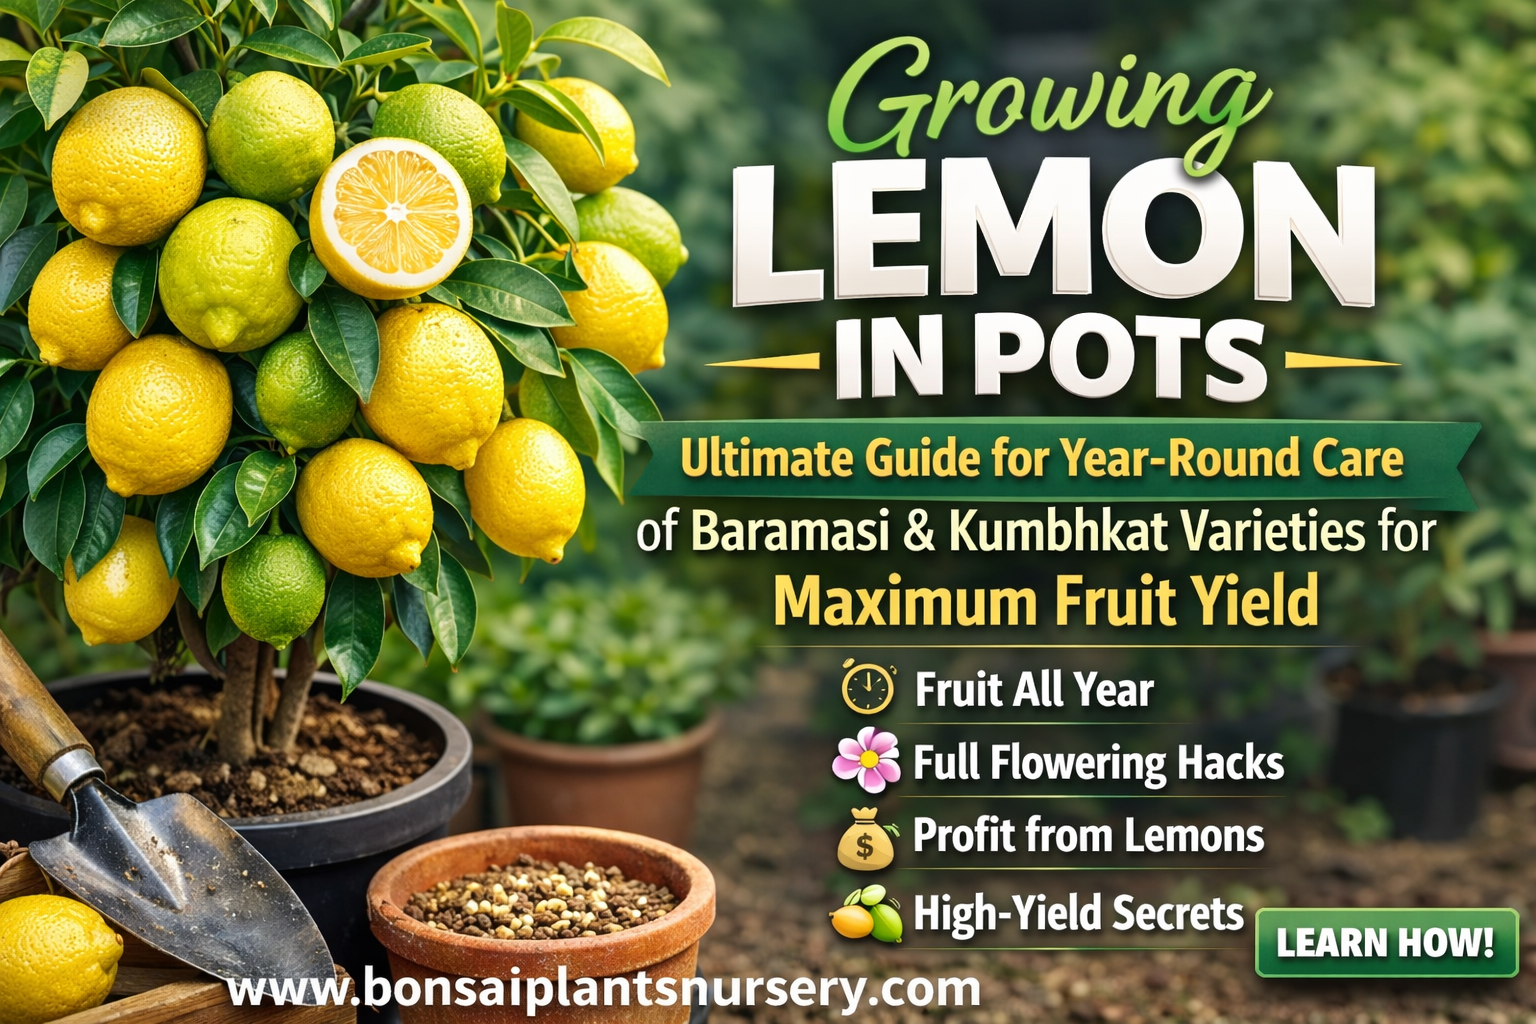
3. Lemon Plant
Lemon plants are highly useful and profitable because lemons are needed throughout the year.
Benefits
- Continuous demand
- Suitable for pots and ground planting
- Year-round production
Planting Method
- Use 18–24 inch pots or open ground
- Ensure proper drainage
Lemon Plant Care
- Regular watering
- Full sunlight
- Monthly organic fertilizer
Professional Tips
- Maintain soil moisture during flowering
- Use micronutrient sprays
4. Papaya Plant
May–June is ideal for papaya plantation.
Advantages
- Fast fruit production
- High-profit crop
- Suitable for small areas
Planting Method
- Well-drained soil
- Maintain 6–8 feet spacing
Papaya Care
- Avoid waterlogging
- Use balanced fertilizers
Professional Tips
- Remove male plants
- Use organic manure regularly
5. Dragon Fruit Plant
Dragon fruit farming has become one of the most profitable modern farming businesses.
Benefits
- Low water requirement
- Premium market price
- Long productive lifespan
Planting Method
- Use cement pole support system
- Sandy soil works best
Dragon Fruit Care
- Light irrigation
- Full sunlight required
Professional Tips
- Use organic mulch
- Install drip irrigation system
Best Vegetable Plants to Grow in May–June
6. Okra (Lady Finger)
Okra grows rapidly in hot weather.
Planting Method
- Sow seeds directly
- Maintain 1-foot spacing
Care Tips
- Water regularly
- Remove weeds frequently
Professional Tips
- Use organic fertilizer
- Harvest regularly for continuous production
7. Bottle Gourd
Bottle gourd performs well in both summer and monsoon.
Planting Method
- Provide support for climbing vines
- Use fertile organic soil
Plant Care
- Regular watering
- Periodic pruning
8. Bitter Gourd
Bitter gourd is highly nutritious and profitable.
Benefits
- Strong market demand
- Medicinal value
Care Tips
- Use support structure
- Requires good sunlight
9. Tomato Plant
Heat-tolerant tomato varieties can also be planted during May–June.
Tomato Care
- Use mulching
- Protect from extreme heat
10. Chilli Plant
Chilli plants grow very well in warm weather.
Professional Tips
- Pinch top shoots for bushier growth
- Use organic liquid fertilizers
Best Flowering Plants for May–June
11. Hibiscus Plant
Benefits
- Flowers throughout the year
- Low maintenance
12. Rose Plant
Care Tips
- Morning sunlight is ideal
- Regular pruning improves flowering
13. Jasmine Plant
Produces fragrant flowers during summer.
14. Marigold Plant
Benefits
- Helps control pests naturally
- Used for decoration and religious purposes
Best Ornamental Plants for Summer
15. Areca Palm
Excellent indoor and outdoor decorative plant.
16. Snake Plant
Requires very little water and maintenance.
17. Money Plant
Perfect for both indoor and outdoor spaces.
18. Croton Plant
Known for colorful decorative leaves.
Best Medicinal Plants for May–June
19. Tulsi (Holy Basil)
Benefits
- Medicinal value
- Spiritual importance
- Easy maintenance
20. Aloe Vera
Benefits
- Useful for skin and health
- Requires less water
How to Care for Plants During Summer
1. Water Plants in Morning or Evening
Avoid afternoon watering because:
- Water evaporates quickly
- Plants may experience stress
2. Use Shade Nets
Especially important for young plants.
3. Mulching is Very Important
Benefits of Mulching
- Keeps soil cool
- Retains moisture
- Reduces weed growth
4. Use Liquid Fertilizers
Liquid fertilizers work faster during summer.
Recommended Organic Liquid Fertilizers
- Compost tea
- Cow dung liquid manure
- Vermiwash
- Seaweed fertilizer
How to Protect Plants from Summer Heat
Important Tips
- Water regularly
- Use shade nets
- Apply mulch
- Loosen soil regularly
Best Time to Apply Fertilizers
Apply fertilizers:
- During evening hours
- After watering plants
Best Organic Fertilizers for Summer Plants
Recommended Organic Fertilizers
- Cow dung manure
- Vermicompost
- Neem cake
- Bone meal
- Mustard cake fertilizer
Common Summer Plant Problems
Typical Issues
- Leaf burning
- Fungal infections
- Pest attacks
- Wilting
Natural Pest Control Methods
Neem Oil Spray
One of the safest and most effective organic pest control solutions.
Buttermilk Spray
Helps prevent fungal diseases naturally.
Garlic-Chilli Spray
Useful for controlling insects and pests.
Terrace Garden Care During May–June
Concrete rooftops become extremely hot during summer.
Problems
- Pots heat up quickly
- Soil dries faster
- Root stress increases
Solutions
- Use white grow bags
- Double potting method
- Mulching
- Temporary shading
How to Select Healthy Plants from Nursery
Signs of Healthy Plants
- Green leaves
- Strong stems
- Disease-free growth
- Healthy roots
Benefits of Buying Plants from a Trusted Nursery
- Better survival rate
- Faster growth
- Early flowering and fruiting
- Disease resistance
Why Drip Irrigation is Important in Summer
Advantages
- Saves water
- Maintains proper moisture
- Reduces labor
- Improves plant health
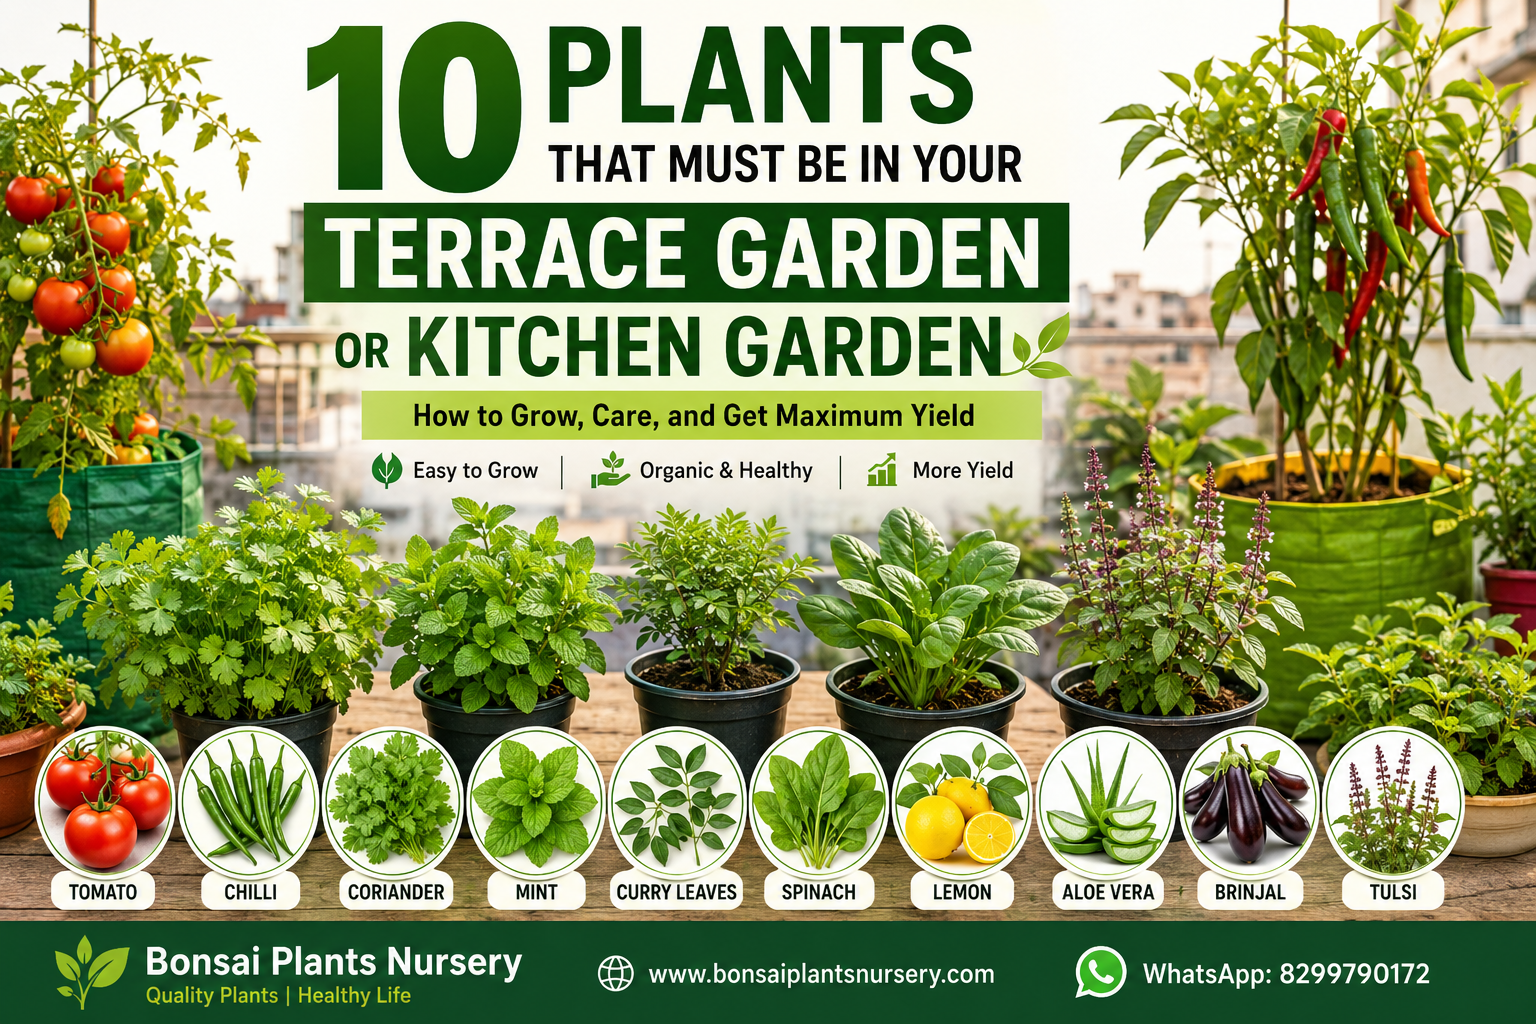
Best Kitchen Garden Plan for May–June
Fruit Plants
- Lemon
- Guava
- Papaya
Vegetables
- Okra
- Chilli
- Bottle gourd
Herbs
- Mint
- Tulsi
- Coriander
Professional Gardening Tips
1. Companion Planting
Examples:
- Tomato + Basil
- Chilli + Coriander
This helps reduce pests naturally.
2. Regular Pruning
Encourages fresh growth and improves productivity.
3. Focus on Organic Gardening
Organic gardening produces healthier and safer vegetables and fruits.
Common Mistakes Beginners Make
- Overwatering
- Using poor-quality soil
- Ignoring sunlight needs
- Choosing very small pots
- Lack of mulching
Avoiding these mistakes can greatly improve plant growth.
Final Thoughts
May and June are among the best months to establish a strong and productive garden. With the right plants and proper care, you can enjoy healthy growth, beautiful flowers, and excellent fruit and vegetable production throughout the year.
The key factors for success are:
- Healthy soil
- Proper watering
- Mulching
- Organic fertilizers
- Quality plants
If you are looking for high-quality fruit plants, terrace garden plants, decorative plants, exotic plants, or professional gardening guidance, contact:
Bonsai Plants Nursery
🌿 Fast Growing Quality Plants
🌿 Fruit Plants | Terrace Garden Plants | Decorative Plants
🌿 Wholesale & Retail Available
🌐 www.bonsaiplantsnursery.com
📱 WhatsApp: 8299790172
Start your gardening journey today and fill your home with greenery, freshness, and natural beauty.