Buy best quality fruit plants online at https://bonsaiplantsnursery.com/shop/ How to Bonsai Fruit Plant Step by Step Process What is a Bonsai Tree? Bonsai is not a genetically altered plant to create a dwarf like-version of a full-size species. Rather through careful cultivation, pruning, and wiring of the branches, tree to stay under 4 feet (a generally accepted height), and still bear flowers and fruits if desired. Step 1: Choosing Your Bonsai Fruit Plant Bonsai can be grown with a number of different plants and trees. People have made bonsai out of bushy shrubs and fruit trees. Step 2: Potting Your Bonsai Fruit Tree If you’re starting your own bonsai and not buying a pregrown one from a nursery, you’ll need a good pot. Ideally, it should be shallow and small so that the tree’s roots don’t spread out too far, causing it to get too big. Step 3: Styling Your Bonsai Fruit Tree It’s important that the style is sympathetic to the matches plant that you have selected. Once you have settled on a preferred style, it’s time to get pruning and shaping. Step 4: Wiring Your Bonsai Fruit Tree If you’re not happy with how some of your branches are growing, you can use a technique called wiring. For this technique, you will need quality gardening wire. You’ll need to be gentle and wrap tightly. This will force the branch to move every few weeks. Once your Bonsai has achieved the desired shape, you can remove the wiring. Step 5: Caring For Your Bonsai Fruit Tree Now that you’ve planted, potted, and styled your Bonsai, you need to ensure that proper ongoing care is given. Each individual type of fruit plant will have its own needs. Basic Care Tips For Bonsai Fruit Gardeners Watering Wait until the soil is slightly dry to water your Bonsai and avoid overwatering. Temperature Be sure to keep your bonsai out of direct sunlight when the temperature is hot outdoors. Repotting It is likely you will need to repot your Bonsai over a few years until it gets to the size you’d like. If the leaves look yellow, or the roots dried, the pot should be changed to a larger one Maintenance Once your Bonsai has grown into your desired shape, you’ll need to prune it a little every year. Be careful to not remove any additional branches when you are pruning.
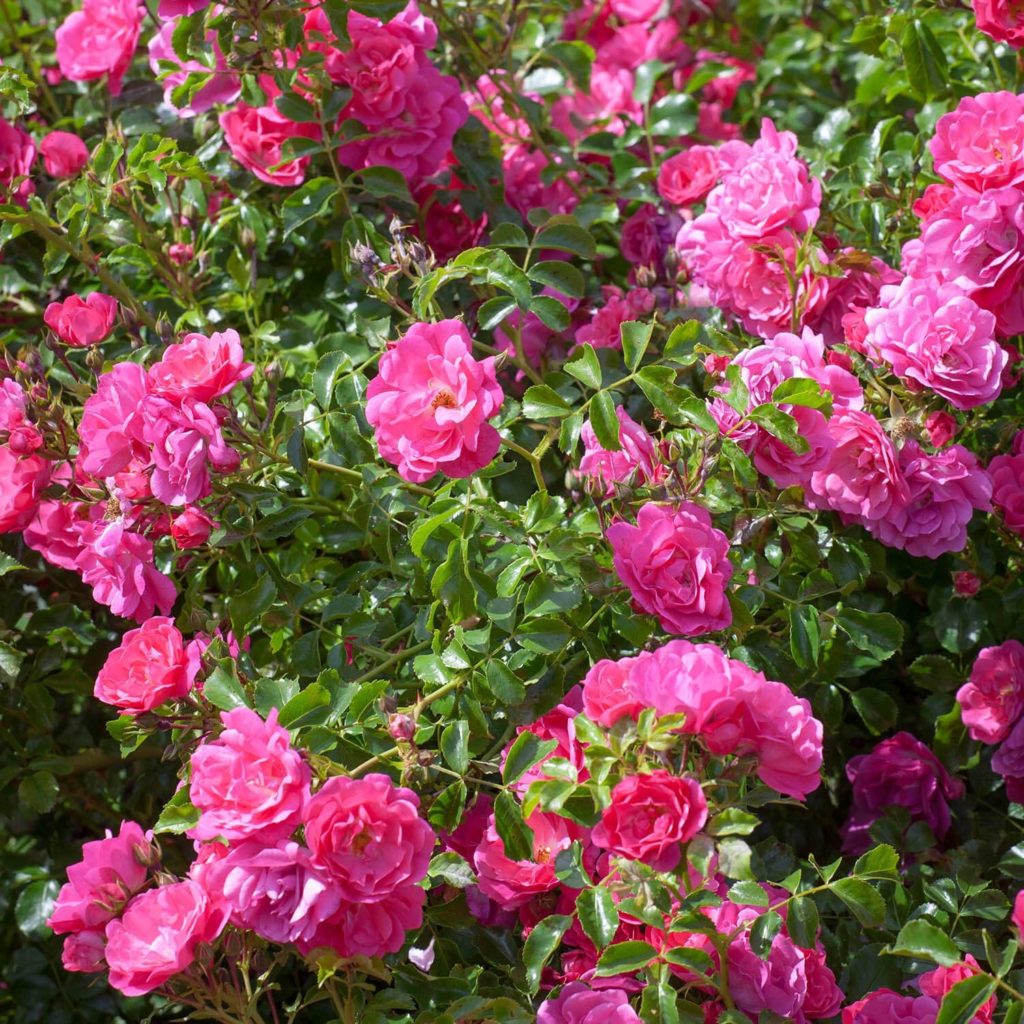
क्या आपके घर में लगे गुलाब के पौधे में फूल नहीं आ रहे या आना बंद हो गए हैं, तो आपको घबराने की बिल्कुल जरुरत नहीं है। आज आपको ऐसे अचूक तरीके पता चलेंगे। जिन्हें आप अपने गुलाब के पौधे पर आजमा कर अपने गुलाब के पौधे से पुनः ढेर सारे गुलाब पा सकते हैं।
अगर आपका गुलाब का पौधा 2 साल पुराना हो चूका है और उसमें फूल नहीं आ रहे हैं तो आप समझ जाइये की आपको अपने गुलाब के पौधे की रिपौटिंग करने का समय आ गया है।
क्या होता हैं न की पौधा अधिक दिनों तक एक ही गमले में रहने से उसकी जड़ें पूरे गमले में अपना कब्जा कर लेती हैं और फिर स्थान की कमी होने पर उसकी जड़ें अच्छे से ग्रोथ नहीं कर पाती हैं। जिस वजह से गुलाब में फूलों की कमी आ जाती है। तो आपको फिर से उस गुलाब के पौधे से फूल पाने के लिए उपाय यह करना है कि उस गुलाब के पौधे को गमले से निकालकर उसकी जड़ों में लगी सारी मिट्टी को निकालकर उसकी जड़ को साफ पानी में रख दें। उसके बाद आप गमले को साफ करके नयी मिटटी लेकर उसमे गुलाब का पौधा लगा दें। आप पुराने गमले के जगह कोई नया और उससे बड़ा गमला भी ले सकते है। ऐसा करने से आपके गुलाब के पौधे में पहले से अधिक फूल आने लगेंगे।
नोट :- पौधे की रिपोटिंग करते समय गुलाब की पुरानी शाखाओं को काट देना चाहिए और मिटटी में वर्मीकम्पोस्ट को मिला लेना चाहिए।
तरीका न. – 2
गुलाब के पौधे में जब पहला फूल आये तो उसे तोड़ लें। उस फूल को तोड़ने का भी एक तरीका होता है। आपको फूल के नीचे एक साथ तीन पत्तियाँ जहाँ तक दिखें और जहाँ से पाँच पत्तियाँ दिखनी सुरु हो जाये। तो जहाँ से तीन पत्तियाँ दिखना शुरू हो जाये तो वहाँ से उस हिस्से को फूल सहित काट दें।
तरीका न. – 3
जिस गमले में गुलाब लगा हो उसकी मिटटी में आयोडीन नमक या मैगनीशियम सल्फेट का एक-एक चम्मच डाल दें। इसके साथ ही आधा चम्मच पोटाश भी डाल दें।
ध्यान रहे की ये चीजें आप पौधे के तने के पास बिल्कुल न डालें। गमले के किनारे पर डालें।
आप आयोडीन नमक, मैगनीशियम सल्फेट और पोटाश की उतनी ही मात्रा लेकर उसको पानी में मिलाकर। आप गुलाब के पौधे की पत्तियों पर स्प्रे भी कर सकते हैं। इससे पौधे को सीधे पत्तियों से पोषण मिलता है।
आप अपने गुलाब के पौधे में गोबर की खाद डाल सकते हैं और ब्लूम बड़ी नामक खाद भी मिला सकते हैं। जो आपको आसानी से मार्केट में मिल जायेगी।
नोट :- आप अपने गुलाब के पौधे में Amrutras liquid organic fertilizer डालने से आपका गुलाब का पौधा पहले और अधिक फूल देने लगेगा। आपको यह मार्केट से बहुत आसानी से मिल जायेगा। अगर नहीं मिलता है तो आप इसे ऑनलाइन भी आर्डर कर सकते हैं
Desert Rose Plant Info: Caring For Desert Rose Plants Plant lovers are always looking for easy to grow, unique plants with a fun aspect. Adenium desert rose plants are perfect specimens for the intrepid or novice gardener.These East African and Arabian natives are wonderful in the interior container garden or as warm climate additions to the patio display. Caring for desert rose plants requires a full sun location and well-drained soil. Properly mimicking their native regional conditions will garner plenty of rose-like blooms on an architectural marvel of a plant. Desert Rose Plant Info Desert rose has become a popular ornamental garden plant in United States Department of Agriculture zones 10 to 11. The rest of us in cooler zones will have to resort to growing Adenium indoors, giving the plant a vacation in the summer on the patio or deck. Desert rose plant care can be difficult and requires some knowledge of the life cycle of the species. Adeniums are succulent, tropical plants. They are distinctive among the class because they develop a caudex, or swollen trunk. All succulent plants have some sort of water storage system, be it leaves, stems or roots. In desert rose, the trunk swells to conserve moisture for times of drought. A nice fat trunk is an indicator of plant health. A skinny stem can indicate that the plant requires more moisture. An interesting bit of desert rose plant info is its natural resemblance to a bonsai plant, with a short stature when mature, and tidy canopy perched atop the graduated stem. Many growers seem to have trouble caring for desert rose plants, but these can truly be easy to maintain if you keep in mind the water, temperature and lighting needs of Adenium. Adenium Desert Rose Growing Tips First, remember that Adenium plants are native to regions with poor, gritty soil and hot, sunny climates. You can’t expect the plant to thrive in overly moist soil, in a site with limited light. They are also not frost tolerant and will succumb to a freeze if exposed. The plant will not survive long if exposed to temperatures below 40 degrees F (4 C) but will thrive in temperatures reaching up to 90 degrees F (32 C). Desert rose succulents like bright light, so a southern window exposure provides enough sun for the plants to flourish and bloom. In the garden, choose a sunny location that has some protection from noonday sun, as this can scorch the foliage. Soil is very important. Adenium plants should have a mixture of cactus soil with gritty sand or lava rocks for good drainage. Desert Rose Plant Care The one thing that will kill these plants quickly is improper watering. They are succulents but are used to rainy periods during which they grow, followed by a dormant, dry period. Match your watering practices to these needs for best success. Keep soil moderately moist in spring and summer, but reduce watering in fall and especially winter when the plant is dormant. Fertilize with a dilution by half of a 20-20-20 liquid plant food once per month when the plant is actively growing. Do not feed the desert rose during winter. The most common pests are scale, mealybugs and spider mites. Use cotton balls soaked in alcohol to wipe away these insect rogues. Be cautious, as Adenium desert rose is in the Dogbane family, with all species bleeding a poisonous sap that can irritate skin and mucous membranes.
How to Plant and Care for Mogra or Jasmine Plant Mogra plant is dwarf growing shrub with almost stalkless leaves and wavy margins. The plant can be grown as a short climber too. The heavy scented white flowers are borne in clusters of 3 to 12 and may be single, semi-double or perfectly double. The plant flowers mainly in the summer and rainy seasons, but several other flushes during other parts of the year are quite common. Rest Period for Blooms Outdoor jasmine with no blooms can be covered with a dark, lightweight landscape covering, or even a sheet, but be sure to remove it when the sun comes up. The jasmine with no blooms will still need light during the day. Water the non blooming jasmine on a limited basis during this rest period. Withhold fertilization for the four to five week period. Keep temperatures at 40-50 F. (4-10 C.) during the resting time for the jasmine flowers that are not blooming. Gardening Practices for Mogra Plant Watering: Moderate Watering is good for Mogra plant. It is essential in the flowering season. Mogra cannot withstand water logging and plants will be killed in the waterlogged soil in no time. Watering is stopped during November to enable the plants to rest. Defoliation: Once the watering is stopped, the plants shed the leaves. If it does not happen, all the leaves on the plant should be removed by hand. Pruning: Defoliation is followed by a light pruning of stems. Branches are pruned one-third of their length. If than at the right time it will encourage more and bigger blooms. Manuring: Plenty of well-rotted farmyard manure is added to the potting soil after pruning a plant, along with NPK fertilizers. Resumption of Watering: After application of manures, irrigation should commence slowly, and the frequency of watering is increased after the appearance of flower buds. Pests and Diseases Jasmines are tropical plants, one of the most common issues related to them is rust and blight. These two conditions cause damage to the leaves; it can affect the coloration of the foliage, make the leaves wilt, and it can even pass to younger stems or cutting offspring that is taken from the mature plant. Getting Rid of Diseases The best way to get rid of most pests that can affect your Jasmine plants is to create a soapy solution that you can apply to the leaves of the plant. If you know what the pest is, then you can target it specifically with an insecticide spray. Harvesting Mogra flowers The plant begins to flower second year onwards after planting. The flowers are harvested in bud stage either in the evening or early in the morning by handpicking. Flower buds are used for garland making, adorning hair, worshipping, decoration, and extraction of perfume. Article Sources:https://www.gardeningknowhow.com/ornamental/flowers/jasmine/non-flowering-jasmine.htm
Air layering is a useful method of producing roots on the stem of indoor landscape plants that have become “leggy” through the loss of their lower foliage.
This method, believed to have been developed centuries ago by the Chinese. It has been used successfully as a mean of propagating some of the more difficult-to-root plants. Because it required excessive care and patience.
The procedure was to wound the stem or branch of a plant and enclose the wounded stem with moist sphagnum moss or similar rooting medium until roots develop from the wounded area. Success was dependent upon the ability of the propagator to keep the rooting medium moist until the roots were formed and large enough to support the new plant. Only since the development of polyethylene film has air layering become a practical method of propagation for the home gardener and amateur horticulturist.
Steps for Making a Successful Air Layering
Step 1 With a sharp knife, make two parallel cuts about 1 1/2 inches apart around the stem and through the bark and cambium layer. Connect the two parallel cuts with one long cut and remove the ring of bark, leaving the inner woody tissue exposed.
Step 2 Apply a handful of damp sphagnum moss so that it envelopes the wounded portion of the stem. Tying the moss in place with string helps keep it in position while completing the process. The sphagnum moss should be soaked several hours to insure that it is thoroughly moist. Squeeze out surplus water before using, since excessive moisture will result in decay and deterioration of the plant tissue.
Step 3 Using a sheet of polyethylene film approximately 6″ X 12″ or 8″ X 12″, depending upon the size of the plant stem, wrap the ball of sphagnum moss using the butchers fold to secure a tight seal where the two ends of the sheet are joined.
Step 4 Draw the upper end of the film snugly around stem making sure that none of the moss is exposed. Fasten securely with electricians tape, taking care that the tape extends beyond the film and adheres to the stem. Repeat the procedure on the lower end, again making sure there is a snug fit. Moisture must not escape and excess moisture must not enter when watering or syringing the plants. Support the plant with stake or splint to prevent breakage at the wounded area.
Step 5 After the new roots have penetrated the moss ball and are visible on all sides, the rooted branch may be removed from the parent plant. The rooting time will vary with plant variety as well as the season in which it is performed.
Step 6 Remove the newly rooted plant from the parent plant with a sharp knife or pruning shears, making the cut just below the ball of moss and roots. Carefully remove the polyethylene film. Without disturbing the roots or removing the ball of moss, plant in a container using a good potting mixture or plant in a well-prepared soil bed.
Step 7 Placing a polyethylene tent over the newly potted plant for 4 to 8 days until the root system is well established. It is helpful as it will aid in preventing excessive loss of moisture. Keep the plant under a light shade and avoid direct sunlight until the new root system is well developed.
Many plants are lost in the final stage of the process because the root system is not sufficiently developed to sustain the top portion of the new plant. By keeping the new plant in a humid environment, it is possible to develop a good root system on rather large cuttings. Once the plant is well established, it is best to harden off the foliage by gradually exposing it to normal atmosphere.
How to Do Air Layering of Any Fruit Plant Air layering is a useful method of producing roots on the stem of indoor landscape plants that have become “leggy” through the loss of their lower foliage. This method, believed to have been developed centuries ago by the Chinese. It has been used successfully as a mean of propagating some of the more difficult-to-root plants. Because it required excessive care and patience. The procedure was to wound the stem or branch of a plant and enclose the wounded stem with moist sphagnum moss or similar rooting medium until roots develop from the wounded area. Success was dependent upon the ability of the propagator to keep the rooting medium moist until the roots were formed and large enough to support the new plant. Only since the development of polyethylene film has air layering become a practical method of propagation for the home gardener and amateur horticulturist. Steps for Making a Successful Air Layering Step 1 With a sharp knife, make two parallel cuts about 1 1/2 inches apart around the stem and through the bark and cambium layer. Connect the two parallel cuts with one long cut and remove the ring of bark, leaving the inner woody tissue exposed. Step 2 Apply a handful of damp sphagnum moss so that it envelopes the wounded portion of the stem. Tying the moss in place with string helps keep it in position while completing the process. The sphagnum moss should be soaked several hours to insure that it is thoroughly moist. Squeeze out surplus water before using, since excessive moisture will result in decay and deterioration of the plant tissue. Step 3 Using a sheet of polyethylene film approximately 6″ X 12″ or 8″ X 12″, depending upon the size of the plant stem, wrap the ball of sphagnum moss using the butchers fold to secure a tight seal where the two ends of the sheet are joined. Step 4 Draw the upper end of the film snugly around stem making sure that none of the moss is exposed. Fasten securely with electricians tape, taking care that the tape extends beyond the film and adheres to the stem. Repeat the procedure on the lower end, again making sure there is a snug fit. Moisture must not escape and excess moisture must not enter when watering or syringing the plants. Support the plant with stake or splint to prevent breakage at the wounded area. Step 5 After the new roots have penetrated the moss ball and are visible on all sides, the rooted branch may be removed from the parent plant. The rooting time will vary with plant variety as well as the season in which it is performed. Step 6 Remove the newly rooted plant from the parent plant with a sharp knife or pruning shears, making the cut just below the ball of moss and roots. Carefully remove the polyethylene film. Without disturbing the roots or removing the ball of moss, plant in a container using a good potting mixture or plant in a well-prepared soil bed. Step 7 Placing a polyethylene tent over the newly potted plant for 4 to 8 days until the root system is well established. It is helpful as it will aid in preventing excessive loss of moisture. Keep the plant under a light shade and avoid direct sunlight until the new root system is well developed. Many plants are lost in the final stage of the process because the root system is not sufficiently developed to sustain the top portion of the new plant. By keeping the new plant in a humid environment, it is possible to develop a good root system on rather large cuttings. Once the plant is well established, it is best to harden off the foliage by gradually exposing it to normal atmosphere.
क्या आप जब पौधों को नर्सरी या ऑनलाइन नर्सरी से लेते हैं तो आपके द्वारा वह पौधे लगाए जाने पर सूख जाते हैं या उनकी ग्रोथ अच्छे से नहीं होती। तो आपको घबराने की बिल्कुल जरुरत नहीं है। आज आप बिल्कुल ऐसे तरीके जानने वाले है जो तरीके नर्सरी में प्रयोग किये जाते हैं।
अगर आपने किसी पौधे को लोकल नर्सरी से लिया है तो आपको बस उनको लगाने और देखभाल करने के तरीके को ही जनना है।
अगर आपने किसी पौधे को ऑनलाइन नर्सरी से आर्डर किया है तो पौधा आने के बाद उस पौधे की 4 से 5 दिन कुछ अलग तरीके की देखभाल आपको करनी होगी। जो निम्न्लिखित हैं।
यदि आपके पास पहुंचे हुए पौधे की पत्तियां सूख गयी हैं, या पत्तियों की संख्या कम हो गयी है तो निराश न हों क्योंकि पैकिंग डिब्बे में बंद रहने के कारण पौधे को कुछ दिनों तक धुप और पानी न मिलने से पौधे की पत्तियां सूख या झड़ सकती हैं और कुछ पौधों के लिए वर्तमान मौसम पतझड़ का होने के कारण पत्तियां कम या नहीं भी हो सकती हैं। लेकिन इसका मतलब यह नहीं की पौधा मर गया है क्योंकि पौधे 10 से 12 दिनों तक बिना धुप या पानी के जीवित रह सकते हैं। अतः अगर पौधा ऑनलाइन नर्सरी से आर्डर करने के बाद 10 दिनों के अंदर आपके पास पहुँच गया है तो निश्चित रूप से यह पौधा मरा नहीं है। भले ही इसकी पत्तियां सूखी या टहनी टूटी हैं।
आपके पास पौधे किसी भी स्थिति में पहुंचे हो सबसे पहले आपको पौधों को किसी बर्तन में रखकर उसकी मिट्टी को गीला कर लें और फिर उनको किसी ऐसे स्थान पर रखना है जहाँ धूप बहुत ही कम पहुँच रही हो। अगर आप उनको तेज धूप में रख देंगे तो वह सूख सकते हैं।
आपको पौधों को 4 से 5 दिनों के लिए ऐसे ही खुले में रहने देना है। अगर बारिश हो रही हो तो आप उनको बारिश के पानी में रख दे। बारिश का पानी पौधों के लिए अमृत के समान होता है।
4 से 5 दिनों के बाद पौधे की रिपोटिंग कर दें।
ये तो बात हो गयी ऑनलाइन नर्सरी द्वारा आये पौधों की शुरुआती दिनों की देखभाल की। अब बात करते हैं हम कि पौधों की रिपोटिंग कैसे करें। इसमें हम दोनों ही पौधों की बात करेंगे चाहे वह पौधा आपने लोकल नर्सरी से लिया हो या ऑनलाइन नर्सरी से। दोनों की रिपोटिंग समान तरीके से ही होती है।
अगर आपको पौधा गमले में लगाना है तो यथा संभव बड़े से बड़ा गमला लें। गमला जितना बड़ा होगा पौधे के लिए उतना ही अच्छा रहेगा। मिट्टी के गमले सबसे अच्छे होते हैं लेकिन आप चाहे तो प्लास्टिक, फाइवर और सीमेंट के गमले भी प्रयोग कर सकते हैं। फूल वाले पौधों के लिए कम से कम 6 इंच का गमला और फल वाले पौधे के लिए कम से कम 12 इंच का गमला प्रयोग करें।
जब पौधे को नए गमले में डाला जा रहा हो तो उसमें नयी मिट्टी का इस्तेमाल करें और यह भी ध्यान रहे कि मिट्टी प्रदूषित न हो।
पौधे को लगाते समय मिट्टी में कोई खाद न मिलाएं, गोबर वाली खाद भी नहीं क्योंकि अगर खाद पुरानी न हुई तो उसकी गर्मी से पौधे की जड़ों को नुकसान पहुँच सकता है और पौधा सूख सकता है।
पौधे का पॉलीबैग खींचना नहीं चाहिए। इससे पौधे की जड़ टूट सकती है और पौधा सूख सकता है। पॉलीबैग को ब्लेड या कैंची की मदद से काट कर निकाल दें।
पौधे को पॉलीबैग से निकालने के बाद पौधे की जड़ को थोड़ा सा ढीला कर दें।
अब पौधे को गमले में लगाए। पौधे की जड़ पूरी तरह मिटटी के अंदर होनी चाहिए और पौधा लगाने के बाद मिट्टी को अच्छी तरह से दबा दें।
पौधे को लगाने के बाद उसको पानी देना ना भूलें। ध्यान रहे पानी का तापमान सामान्य होना चाहिए।
गमले में लगे पौधों को सुबह 10 बजे से पहले और शाम को 4 बजे के बाद ही पानी देना चाहिए।
गमले में लगाए गए नए पौधों को ज्यादा तेज धुप आने वाले स्थान पर न रखें।
पौधा लगाने के बाद आप इसमें जैविक खाद डाल सकते है। बिना उचित जानकारी के कोई केमिकल खाद पौधों में न डालें।
3G cutting is word that most of us have heard in different agricultural practices but very few of us know about its actual meaning and process. People are unaware of the benefits of 3g cutting because they are not applying it.
Revolutionary Technique for Doubling Yield in Cucurbit Crops Due to haphazard use of chemical pesticides, the beneficial insects responsible for pollination are sharply decreasing. As a result, very poor pollination takes place in Cucurbitaceae crops. Cucurbit includes cucumber, sponge gourd, bottle gourd, bitter gourd, snake gourd, pumpkin, ridge gourd, ash gourd and many more. There is increasing problem of low fruit set and if there is fruit set; very small fruits are developed that are deteriorated in the mother plant. Most farmers of world including Nepal too are suffering from this problem.
What is 3G Cutting? 3G cutting is such a powerful toolkit in agriculture that can be used to produce optimum production per unit area of land. 3G refers to simply 3rd (Third generation) in any crop i.e. promoting the growth of third (tertiary) branch excluding the 1st & 2nd generation branches. With the seed germination only one main branch continues to grow which is defined is 1st (First generation). If this first branch gives another branch then it is defined as 2nd (Second generation). Further when this 2nd generation branch gives another branch, it is said as 3rd (Third generation).
According to the research studies, the 1st & 2nd generation branches comprise majority of Male flowers rather than female leading to very small ratio of 14:1 (Male: Female) flowers in the branch that creates us false illusion of heavy flowering but with very low fruiting. Thus, 3rd generation branches flush with majority of female flowers. In accordance with proper pollination at this condition it results higher fruit set per branch & finally per plant which ultimately leads to higher production/yield per branch or per plant. The main aim should be focused in keeping 3rd generation branch rather than others.
Steps of 3G Cutting: 3G cutting is very necessary inter-culture in growing cucurbits & very slight influence in tomato which seems easy rather being sensitive at field work. • Initially, the main branch growing from the sown seed must be allowed to grow properly with close carefulness. • After the main branch reaches the height of about 7-8 ft (gourds) or 5-6 ft (cucumber & pumpkin), cut the tip growing part of plant about 4-5 inches. • After the apical part is removed it promotes the growth of secondary branch. This is because of translocation of photosynthesized food to the secondary branch. • Now, after the secondary generation branch has grown upto 2-3 ft height, then the upper apical part of this branch also should be removed as the previous one. This will now promote the growth of tertiary branch or third generation branch. • Now, the third-generation branch should be allowed to grow with optimum fertilization of nutrients. This will lead to heavy flowering of female flowers in the plant.
Objectives of 3G Cutting The main objective of 3G cutting is maintaining of proper ratio of male and female flowers in plant from which the optimum production can be harvested. And increasing the crop production exponentially.
Special Attention:
Make sure that lower 4-5 leaves of plant do not bear any branches i.e. secondary branches.
Cut the apical part of second-generation branches at 12 leaves stage i.e. just above the 12th leaf.
Main branch apical part must be cut off when plant height reaches at 7-8 ft tall.
3G cutting is very new and innovative technique of interculture or cutting in cucurbit crops and solely new in country like Nepal. In fact this technique is very advantageous and useful to farmers from profit making point of view.
Do you know when or how to properly repot a plant? Many of us wait until it is bursting out of its pot, pull it out, put it in a new pot, add some soil and hope it grows.
Here are a few signs that your plant needs a new home:
The plant simply looks like it is too big for its pot
The roots are growing out of the drainage holes
Water is sitting on the top and not absorbing
The soil is dried out or looks like it is disintegrating
It’s been years since you repotted it
Whether you are transitioning to a new pot because your flowers are flourishing in the springtime weather or you just want to freshen up your decor, we want to give your house plants the best shot at survival in their new home. Follow the seven simple steps and you will be admiring the handiwork of your green thumb in no time.
Step 1: Choose a larger pot The main reason for repotting is because the plant has begun to outgrow its current home. You will want to give the roots plenty of room so they can support the beautiful part of the plant you get to enjoy. Make sure the new pot is not only wider, but also deeper. We recommend giving the plant at least an extra inch, depending on size. Make sure your new pot has drainage holes. Otherwise your plant might be sitting in water and rotting.
Step 2: Cover the drainage holes with a porous material like a coffee filter. This prevents soil from falling out but still allows water to pass through. If you opt for a terra cotta pot, soak it ahead of time. Terra cotta absorbs moisture, and you don’t want it to dry out the plant.
Step 3: Layer soil in the new pot. Before you place the new plant inside, add a base layer of soil so the roots have new space to grow. Add enough so that your plant has room without spilling over the top.
Step 4: Water the plant. Before you repot it, water it thoroughly. This will help keep the plant healthy and keeps the rootball together.
Step 5: Remove the plant from it’s old pot. Rather than pulling the plant out, turn it upside down while placing your hand over the top of the pot. Rotate the plant a few inches in both directions to loosen it up and allow it to fall out. You can use a knife to help separate the plant and the pot.
Step 6: Prune the rootball and untangle old roots. Pruning older roots will help the plant flourish in its new pot. Remove roots that are growing out of the core rootball. Now that you only have the new, healthy roots to deal with, untangle them so they grow outward instead of internally.
Step 7: Place the plant in it’s new pot. Make sure the plant is centered and upright then press it firmly into it’s new home and add soil. Once you have patted it down, water it to help settle the soil.
Don’t forget to place your plant in a decorative basket of your choosing! Perfect for holidays, festivities or as a decorative touch for just about any space. Now that your plant is potted, make sure you continue to care for it properly.
Spring and fall are the best planting times, but it can be all too easy to end up with an empty wallet and a garden filled with struggling, diseased or even dead plants. Thankfully, visits to the nursery can be enjoyable, and successful, as long as you arm yourself with the knowledge to ensure you will come home with beautiful, healthy plants that will increase the curb appeal of your home and garden.
Make sure you learn this before buying new plants
Plan Before Buying Before you head out to the nursery, it’s important to study the area in your garden where you plan to add your new plant or plants. Here is what you will need to know about the proposed planting location:
Exposure: Does it get full sun, filtered sun or shade? What direction does the plant location point toward? For example, areas that face west often get hot full sun in the late afternoon, while northern exposures tend to be shady. Planting sites that face east get morning sun and afternoon shade, and southern exposures get an even amount of sun all day.
Space: How much room is there for a plant to grow? If it is a large area, you may need several smaller plants or a single plant that will grow large.
Soil: What type of soil do you have? There are three main types of soil — clay, loam and sandy — and often plants have a preference for a specific type.
Avoid Impulse Buys It can be easy to fall in love with the vibrant blooming plant prominently displayed at the nursery and then buy it without knowing where it will go in the garden or even if it will do well in your climate. This can result in a plant that has a decreased chance of survival.
Sadly, it isn’t uncommon for some large chain stores to sell plants that are ill-suited to the particular climate they are located in. Your best bet is to walk on by that pretty plant, unless you have time to do a little research. Before you buy, work with a landscape designer who has local plant knowledge or contact your local cooperative extension office and ask to speak with a Master Gardener who can provide you with helpful information.
Read the Label Most plants come with their own instruction manual in the form of a plant tag. Types of information that you can find on the tag include the name of the plant, how big it will grow, when it will bloom, what exposure it needs and its water requirements. All of the plant’s information isn’t always listed on its tag, but with the name, you can do a little online research on your own.
Know the Signs of Unhealthy Plants Unfortunately, there can be some unhealthy plants present at the nursery. Here are some warning signs to look out for so you can make sure you won’t take home an ailing plant.
Yellowing leaves: This can be an indicator of nutrient deficiency, overwatering or both.
Root-bound plants: When plants have been growing in their nursery container too long, their roots begin to grow in circles, making it hard for them to absorb water or nutrients. A sign of a root-bound plant includes its roots growing through its container’s drainage holes, or you can ask the nursery professional to carefully pull the plant from the pot so that you can see the root system. Root-bound plants will have a thick mat of roots at the bottom and around the sides of the plant.
Pests or disease: Plants at the nursery can be harboring harmful insect pests or diseases, which can infect nearby plants in your garden. Check the leaves for spots or speckling, which can be a sign of damage. Insects tend to hide underneath leaves or on stems.
Weeds: Look closely at the top of a plant’s rootball to be sure there aren’t any weeds lurking, trying to hitchhike their way to your home. You can simply pull the weeds out before planting.
Wilting leaves: It’s obvious that a plant hasn’t been watered enough at the nursery when its leaves begin to wilt. Sometimes all plants need is a good deep watering to recover.
Buy Local Plants Whenever Possible Plants have a much higher chance of survival if they’re planted close to where they were grown, where the climates are similar. Plants that have been brought in from a different climate may not have had the chance to acclimate to new weather conditions. For example, plants grown in California enjoy the mild, Mediterranean climate. A shipment of plants from California to the hot, dry desert or cold, mountainous regions can suffer and even die if the plants haven’t had a chance to “harden off” — that is, to gradually get used to a change in temperatures.
Check for a Warranty Does the nursery where you shop offer a warranty? There are some nurseries, usually larger ones, who offer warranties in case plants die within a few months after planting.
Many smaller, local nurseries don’t. The reason for this is that they cannot control how the customer waters or cares for the plant, which may result in its death.
If you are choosing a plant that isn’t easy to grow, you may want to find a nursery that will offer a warranty for that plant. Or you can always buy a plant that is easy to grow in your area, so that a warranty will most likely not be needed.
Ask a Certified Nursery Professional If you have questions about a particular plant or need help selecting the right type of plant for your landscape, work with a landscape designer in your area or ask the certified nursery professional or horticulturist at the nursery where you are shopping. They have completed lengthy training and can be an invaluable resource.
It’s important to note that not everyone who works at a nursery knows a lot about plants, so don’t be afraid to ask to speak with the certified nursery professional on staff about your questions.
 test productSale!
 Spathiphyllum or spath or peace lilies Live PlantSale!
 Thai all season grafted mango plant for pot and gardenSale!